

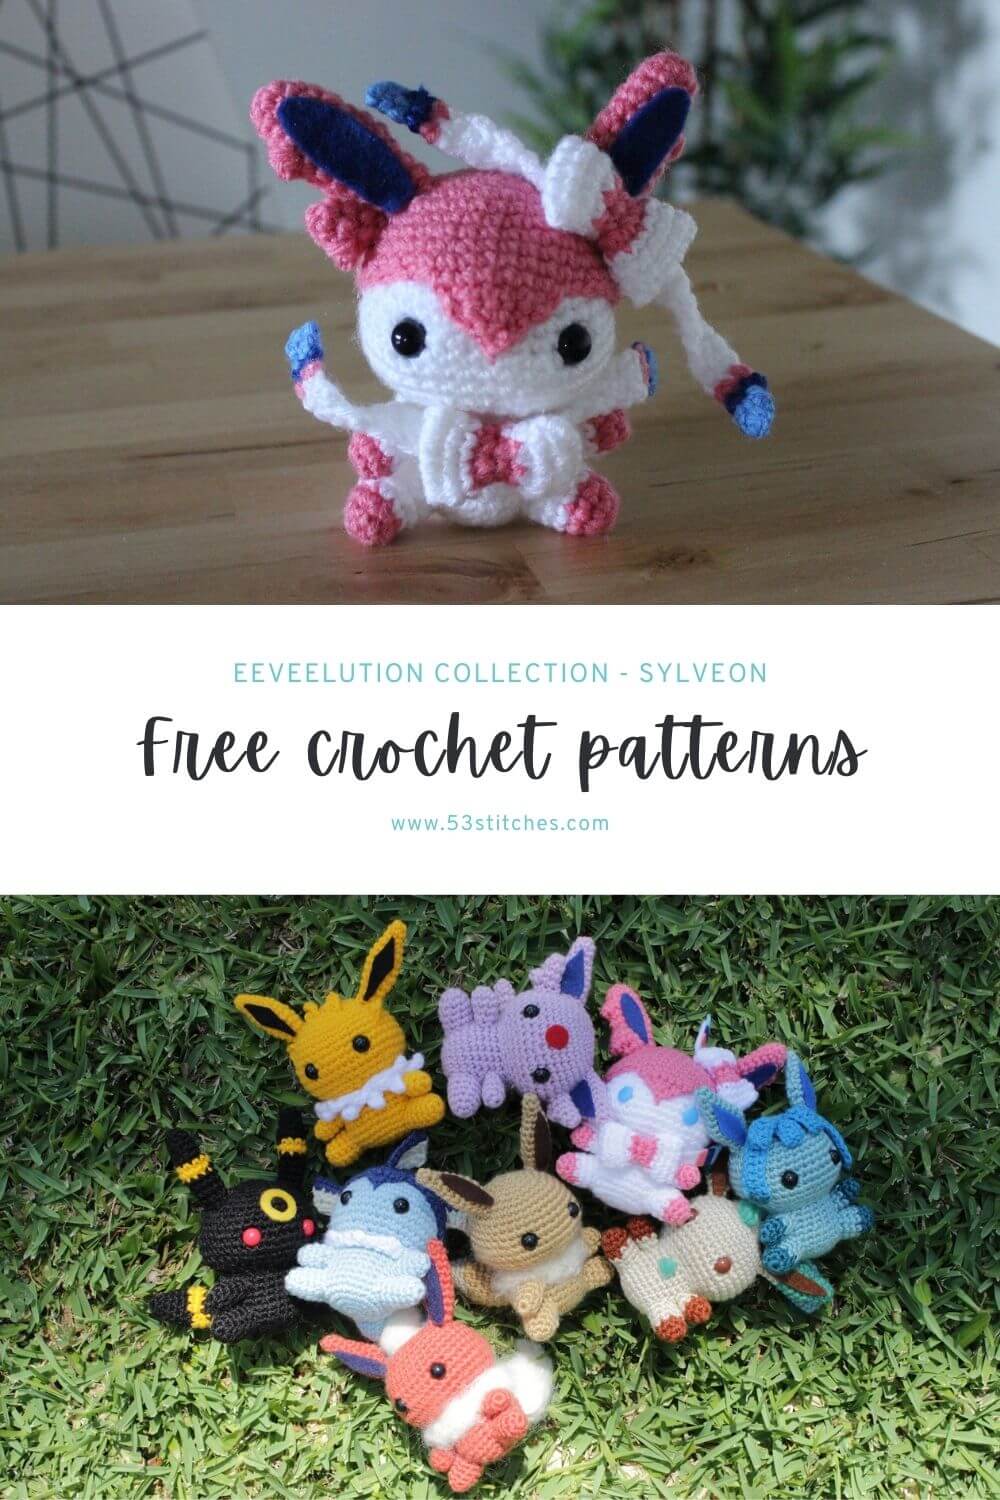
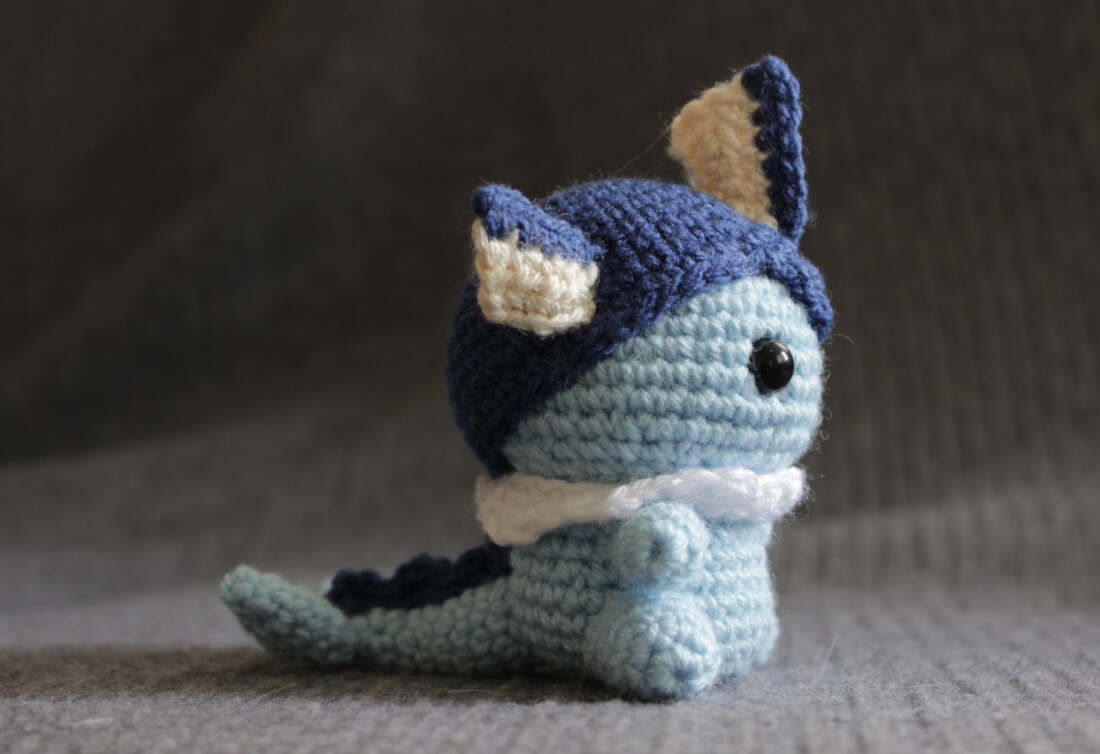
At long last Sylveon joins the Eeveelution crochet pattern collection! They were trickier than I anticipated, but extremely satisfying to finish. The Sylveon design is my favourite Eeveelution – the colour combination is great, the bows are SO CUTE. This free Sylveon crochet pattern might be a little tricky for beginners, but there are plenty of resources so if you’re up for a challenge, definitely give it a go! All they require is a bit of patience.
You can purchase and ad-free PDF of this pattern over on my Ravelry or Etsy, and if you do a huge thank-you in advance for your wonderful support! You can also find a diy crochet kit on my Etsy which has all the materials you need to make your own!
What materials will you need?
Note some of the links on this site are affiliate links. This means I get paid a small fee if you decide to purchase anything at no extra cost to you. I will only ever link products I happily use myself.
- 3.00mm crochet hook
- 2 x 10mm safety eyes
- white yarn
- pink yarn
- light blue yarn
- blue yarn
- blue felt
- polyester filling
- fabric glue
- yarn needle
Quick reference for beginners
Check out some of the below tutorials if you get stuck on any of the stitches or techniques
- How to read patterns
- Magic ring
- Single crochet
- Increase
- Decrease
- Popcorn stitch
- How to change colours
- Chain
- Slip stitch
- Double crochet
- Half double crochet
- Attaching amigurumi limbs
If you get stuck anywhere else, check out the FAQ.
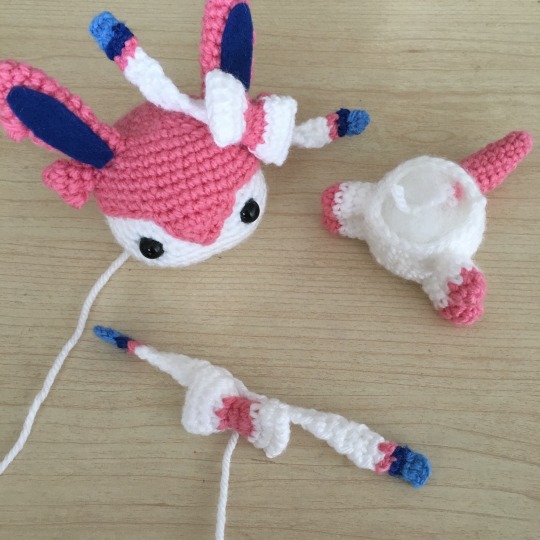
Let’s start crocheting Sylveon!
HEAD
1. (in White) MR 6 (6)
2. [ inc ]x 6 (12)
3. [ inc, sc ]x 6 (18)
4. sc, [ inc, sc 2 ]x 5, inc, sc (24)
5. [ inc, sc 3 ]x 6 (30)
6. sc 2, [ inc, sc 4 ]x 5, inc, sc 2 (36)
7-10. sc 36 (36)
11. [ inc, sc 5 ]x 6 (42)
12-13. sc 42 (42)
14. [ dec, sc 5 ]x 6 (36)
15. sc 2, [ dec, sc 4 ]x 5, dec, sc 2 (30)
16. [ dec, sc 3 ]x 6 (24)
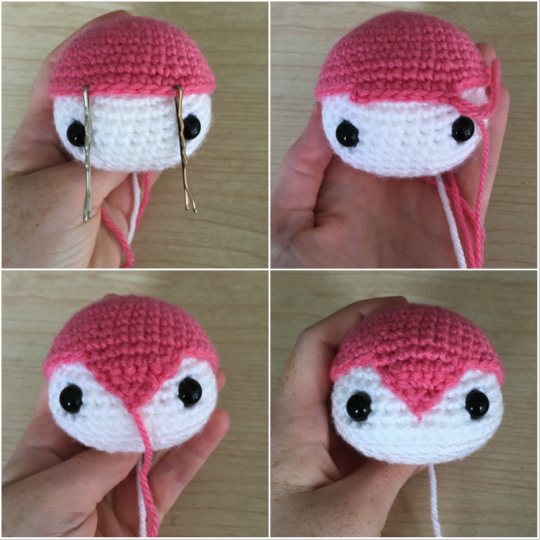
Finish off, leaving a tail for sewing. Insert the safety eyes between rows 10 and 11, with approximately 7 stitches between them. If you wanted the blue eyes, you could also use a light blue felt, or I’ve heard of people painting their safety eyes with spray paint or nailpolish.
Stuff the head at this point, so that you can make sure the head cap fits properly.
HEAD CAP
1. (in Pink) MR 6 (6)
2. [ inc ]x 6 (12)
3. [ inc, sc ]x 6 (18)
4. sc, [ inc, sc 2 ]x 5, inc, sc (24)
5. [ inc, sc 3 ]x 6 (30)
6. sc 2, [ inc, sc 4 ]x 5, inc, sc 2 (36)
7-10. sc 36 (36)
11. [ inc, sc 5 ]x 6 (42)
12-13. sc 42 (42)
Finish off. Now we’re not done with the head cap just yet. We’re going to pick up 7 stitches and crochet the triangular forehead. In the picture below I’ve used two bobby pins to mark the first stitch we’ll pick up and the last stitch we’ll pick up. This way I can make sure that it will cover the area I want it to. Depending on the yarn and hook you’ve used, you may want to pick up more or fewer stitches.
14. (pick up 7 sc) (7)
15. dec, sc 3, dec (5)
16. dec, sc, dec (3)
17. dec3 (1)
18. ch to finish off (1)
Finish off, use tail to attach to the head.
BODY
1. (in White) MR 6 (6)
2. [ inc ]x 6 (12)
3. [ inc, sc ]x 6 (18)
4. sc, [ inc, sc 2 ]x 5, inc, sc (24)
5. [ inc, sc 3 ]x 6 (30)
6-8. sc 30 (30)
9. [ dec, sc 3 ]x 6 (24)
10-12. sc 24 (24)
Finish off.
LEG (make 2)
1. (in Pink) MR 6 (6)
2. [ inc, sc ]x 3 (9)
3. sc 9 (9)
4-6. (in White) sc 9 (9)
Finish off, leaving a tail for sewing.
ARM (make 2)
1. (in Pink) MR 6 (6)
2. [ inc, sc 2 ]x 2 (8)
3. sc 8 (8)
4. (in White) sc 8 (8)
5. dec, sc 6, (7)
Finish off, leaving a tail for sewing.
TAIL
Main Tail
1. (in Pink) MR 6 (6)
2. sc 6 (6)
3. inc, sc 5 (7)
4. inc, sc 6 (8)
5-6. sc 8 (8)
7. inc, sc 7 (9)
8. sc 9 (9)
9. dec, sc 7 (8)
10. dec, sc 6 (7)
11. dec, sc 5 (6)
Finish off, leaving tail for sewing.
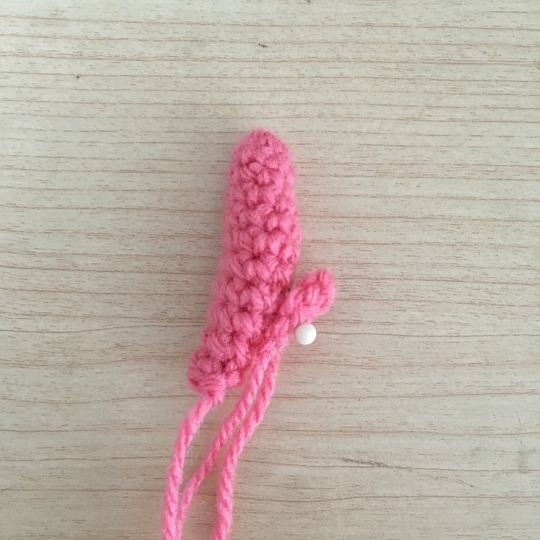
Split
1. ch 4 (4)
2. starting second chain from hook, sc 3 (3)
Finish off, leaving tail for sewing. Then take the smaller piece of the tail and attach it to the longer piece, to create the split/bump shape pictured below.
EARS (make 2)
Ear
1. (in Pink) MR 6 (6)
2. [ inc, sc 2 ]x 2 (8)
3. sc 8 (8)
4. inc, sc 7 (9)
5. 4sc popcorn*, sc 8 (9)
6. inc, sc 8 (10)
7-8. sc 10 (10)
9. [ dec, sc 3 ]x 2 (8)
10-11. sc 8 (8)
Finish off, leaving tail for sewing.
*If you don’t know how to complete a popcorn stitch, have a look at my step-by-step instructions for stitches, found at the FAQ, or have a look at this tutorial. It’s a simple stitch once you’ve learnt it and it’s great for making thumbs or small lumps in a piece.
Now take a piece of blue felt and cut out a rounded oval-like piece to be the inside of the ear. Then glue this piece in place.
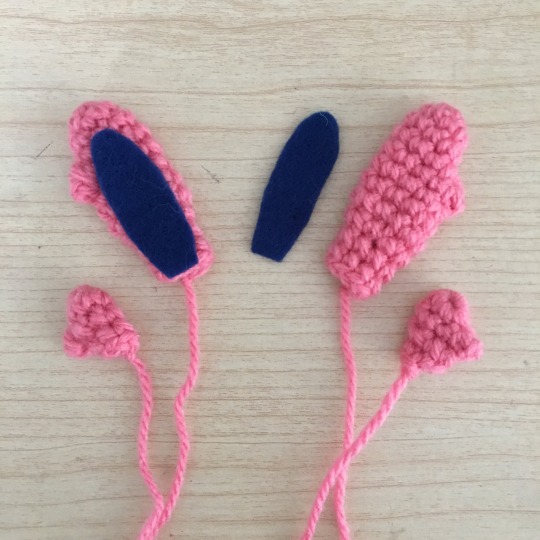
Bottom Fluffy Whiskers
1. (in Pink) MR 6 (6)
2. sc 6 (6)
3. 4sc popcorn, sc 5 (6)
4. sc 6 (6)
Finish off, leaving tail for sewing.
Now the bow can be a little tricky if you’ve never started a piece by crocheting either side of a foundation chain before. All About Ami has a great tutorial here – this is where I originally learnt the technique.
BOW (make 2)
1. (in White) ch 7 (7)
2. (starting second chain from hook) sc 6, either side of chain (12 sc in total) (12)
3-4. sc 12 (12)
5. (in Pink) dec 6 (6)
6. sc 6 (6)
7. inc 6 (12)
8-9. (in White) sc 12 (12)
10. sc 6, sl st 6
Finish off, leaving a tail for attaching to the body. Use the tail to whip stitch the bow’s open edge closed.

RIBBONS (make 2)
I just couldn’t easily get the pointy corners of Sylveon’s ribbon-things, so flat edges it is.
1. (in Light Blue) ch 3 (3)
2. (starting second chain from hook) sc 2, ch1, turn (2)
3. (in Dark Blue) sc 2, ch 1, turn (2)
4. (in Pink) sc 2, ch 1, turn (2)
5-28. (in White) sc 2, ch 1, turn (2)
29. (in Pink) sc 2, ch 1, turn (2)
30. (in Dark Blue) sc 2, ch 1, turn (2)
31. (in Light Blue) sc 2 (2)
32. sc 2 (2)
Finish off, and hide the tails as best you can. This part is pretty time consuming, and especially difficult with such a small working area. Here is a great video demonstrating the correct place to change colours and how to hide edges (the example is a large piece so it’s a bit easier to hide them in the video, but the method is the same).
If you’re having a lot of trouble working it as a flat piece, you can also create a ribbon with the same amount of rows, and the same colour changes, but instead of sc 2 and turning the piece, start with a MR 6 and each row will be another round of 6 sc.
Putting it all together
Now that everything is crocheted it’s time to put it together!
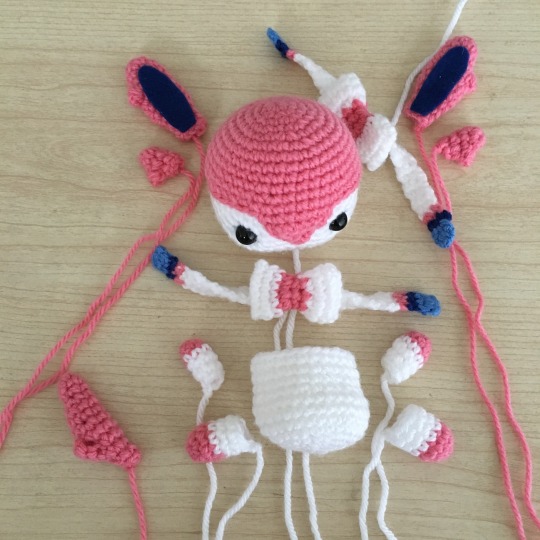
Stuff the head, body and legs. The arms, ears, bows and tail don’t require stuffing. I like to pin all of the pieces together to get an idea of placement before I attach them.
There are so many pieces to Sylveon. I usually like to attach the ribbon to the bow first.
Then the head cap to the head (if this hasn’t already been done). Next the ears to the head cap. The legs to the body, then arms to the body and finally tail to body. Once all of that is done, attach the head to the body, and finally, the ribbon/bows. One set to Sylveon’s left ear, the other to the neck.

Phew! Getting there!
Done!
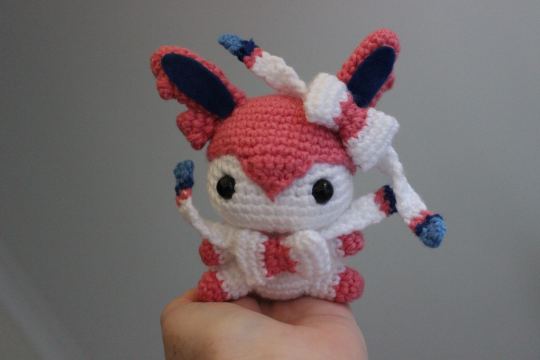
I hope this Sylveon crochet pattern was easy to follow and you had a great time making it! If you share your projects on Instagram or Tumblr be sure to tag @53stitches so I can check them out!
Other Pokemon crochet patterns
If you want to complete the Eeveelution collection yourself, check out the links below to easily jump the next one!
Vaporeon | Jolteon | Flareon | Umbreon | Espeon | Leafeon | Glaceon | Eevee
You can also check out my other Pokemon crochet patterns here.

6 Comments
Lisa
March 1, 2022 at 1:40 pmHi, I think rows 5-28 on the ribbons should say (in white), also, do you chain 1 between rows on the ribbons?
53stitches
March 4, 2022 at 8:31 amYes, you are right! Thanks for letting me know, I’ll get it fixed up. And yup, I chain 1 and turn between rows. I’ll add that in to make it more clear 🙂
Sariah
April 15, 2022 at 6:52 amthis is so adorable! thank you so much for the free patterns! i’m working on all the eevee evolutions right now and sylveon is the second one I have done now. This pattern was really easy to follow!
Carrie
May 2, 2022 at 8:12 amSo cute! Is there a printer friendly version available?
Liz
January 14, 2024 at 3:09 pmHi! This is amazing!! I’m working through your Vaporeon pattern and I’d love to have a little more insight on the end of cap where it says “pick up stitches” and making the little V part? Any insights or additional info would be incredible. Thank you so much!!
53stitches
June 27, 2024 at 4:24 pmSorry for the late reply! I don’t have any further pictures of it on a flat piece, like this cap, so I’ll try explain it in words. Basically, you insert your crochet hook into the stitch that you mark with your stitch marker, as if you were going to do a normal single crochet. In this case, since we’re basically starting in the middle of the piece instead of continuing in the round, you don’t have any yarn to wrap around your crochet hook to do any of the rest of the single crochet.
So what you’ll do instead is make a slip knot, put it on the crochet hook (that’s been inserted into the stitch) and tighten it. Now pull that through – you’ve basically “started” a round in the middle of the piece – you now have one loop on your crochet hook, and you can insert your hook back into that same stitch to “start” your single crochet.
I have a tutorial here: https://53stitches.com/picking-up-stitches/ on picking up stitches on a closed piece, which is a little different because it goes across stitches – but picking them up on a flat piece like here, is usually easier because it’s more similar to doing a regular stitch. Hopefully that helps!