
Picking up a new hobby can always be daunting – making sure you have the right materials, learning a lot of new terms, and figuring out what project to even start on. This is a quick-and-dirty crochet 101 crash course on the very basics, to help you on your crochet journey!
Materials
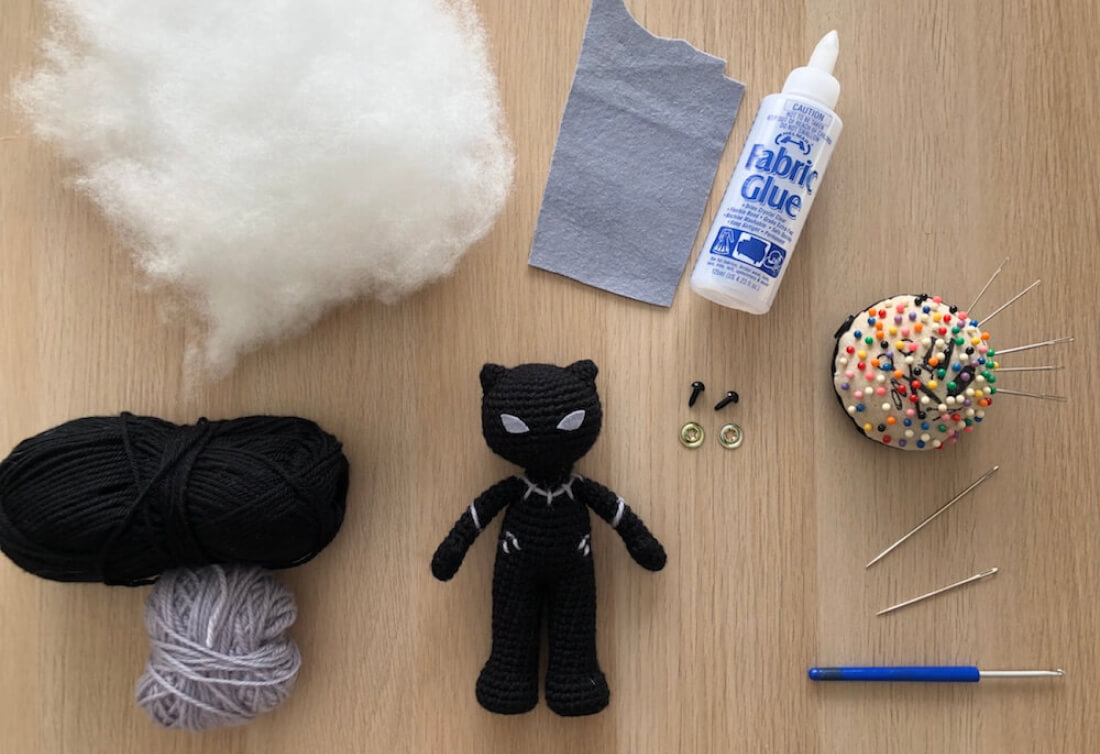
You can go all out on materials, but here’s a few basics which should be enough to get you started. You can read a little bit more about selecting yarn, crochet hooks and safety eyes below.
- Yarn
- Crochet hook
- Safety eyes
- Felt (optional, used on some projects)
- Fabric glue (optional, I use with felt)
- Stitch markers
- No need to buy anything fancy to use as a stitch marker – I find bobby pins to be a perfect tool for the job, and they’re much easier to find!
- Yarn needle
- Scissors
- Stuffing
- such as polyester fiberfill, or hobbyfill, which you can usually find at a craft store. If you have any old pillows lying around you can sacrifice, you can also cut them open and use the stuffing inside.
Yarn / Wool
Yarn comes in a lot of different blends and weight, which can be a bit overwhelming when you’re just starting out. For your first project it’s always a bit easier to start with something cheap and easy to find, so you don’t put too much pressure on yourself to do a perfect job with your pricey wool.
Blend
I started on 100% acrylic yarn from my local department store; and to be honest still use it in the majority of my projects because it’s easy to find and usually has a great colour range.
Weight
I recommend using whatever weight is the most common when starting. For me in Australia, that’s an 8ply yarn. In the US I believe it’s Worsted Weight yarn, and in the UK I think it’s Double Knit (DK) – but please correct me if I’m wrong! You can usually tell pretty quickly just by the abundance of one type of yarn compared to others.
The biggest thing to watch out for as a beginner is that the thinner your yarn is, the smaller your crochet hook will need to be to prevent holes in your work showing through.
Gauge
And one last thing to note on yarn – if you’re grabbing a couple of different colours for the same project, make sure they have the same gauge. You can usually see the gauge on the paper wrapped around the yarn – the symbol looks something like this:


You can read more about gauge here if you’re interested. To start with, you just need to make sure the numbers are the same so that your stitches turn out the same size in the different colours.
Crochet hook
Size
For all of my patterns I use a 3.00mm crochet hook, or a D size hook. I think this might be a fairly uncommon size in the US though (I think 3.5mm is a bit easier to find). For amigurumi, any hook that’s about 3.00mm – 4.50mm will be just fine. Some beginners find it easier to start with a larger hook, but it’s up to you. As I mentioned above, the larger the hook, the larger your stitches will be (and so the larger the space, or ‘holes’ between them); that’s why we want to stay with a pretty small hook for amigurumi.
Material
I use a aluminium hook with a hard plastic handle – but that’s just my personal preference. You can find so many different crochet hooks, bamboo, plastic, metal, soft handle, hard handle, I even have one stashed away somewhere with an in-built light! The only way to know what your favourite will be is for you is to try them out, but any type of material is fine to start with.
Safety Eyes
While not completely necessary to get started (you can add eyes by sewing / using felt / embroidering them on) I use them on almost every doll. You can usually find some at your local craft store. I get mine from Etsy and eBay.
Where to start
There are 4 crochet stitches that make up the building blocks of a majority of amigurumi – the magic ring, single crochet, increase and invisible decrease. If you can master these 4 stitches, it opens up a whole new world of patterns you’ll be ready to tackle.
If you don’t want to dive straight into an entire amigurumi doll just yet, one of the easiest ways to practice these stitches is by making a sphere. An example is below, but there’s one last thing to cover first.
Reading patterns
Reading patterns is probably one of the most daunting things to learn as a beginner, but let’s break it down. There are a lot of different ways people can prefer to write out their patterns, so I’m going to focus on the format I prefer, and what you’ll find in all of the patterns on this site.
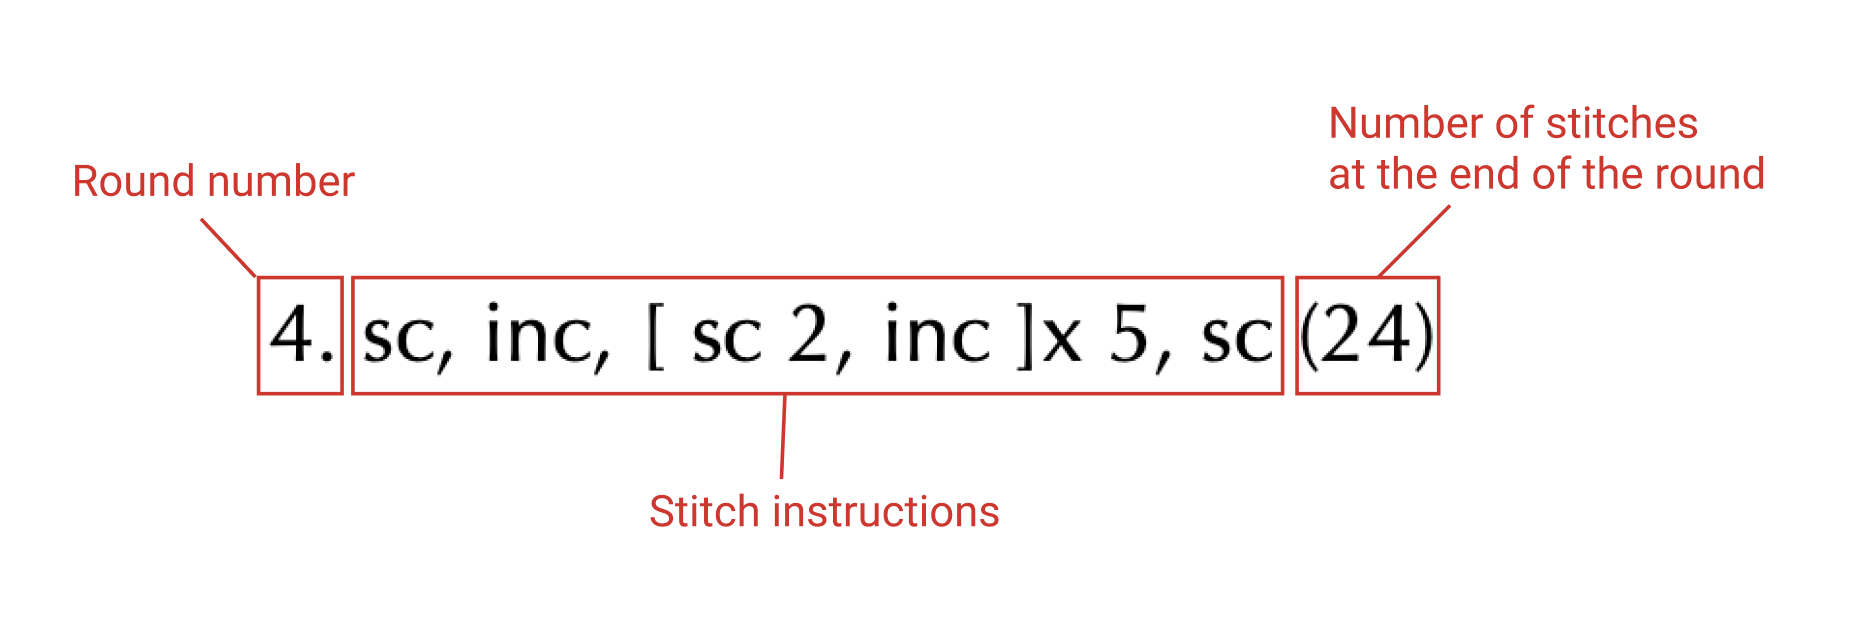
I’d written this out in a bit more detail already, so head over to the “How to read a pattern” page to see how it’s done, and see the stitch instructions broken down even further.
Your first sphere
To keep this nice and simple, we’re going to work the sphere entirely in one colour.
1. MR 6 (6)
2. inc 6 (12)
3. [ inc, sc ]x 6 (18)
4. [ inc, sc 2 ]x 6 (24)
5. [ inc, sc 3 ]x 6 (30)
6. [ inc, sc 4 ]x 6 (36)
7-12. sc 36 (36)
13. [ dec, sc 4 ]x 6 (30)
14. [ dec, sc 3 ]x 6 (24)
15. [ dec, sc 2 ]x 6 (18)*
16. [ dec, sc ]x 6 (12)
17. dec 6 (6)
18. FO
*At this point, you want to stuff the sphere firmly.
I’m ready to make something!
Once you feel ready to tackle a doll from start to finish, check out some of my beginner patterns. I recommend Luna and Artemis if you’re just starting out – they’re worked entirely in one colour, and use only the four stitches mentioned above!
What next?
The next techniques you’ll want to tackle are attaching amigurumi pieces, colour changes, and learning the difference between the right and wrong side of amigurumi. Polishing off these techniques can make a huge difference in how professional your finished product looks like.
The “right” and “wrong” side of amigurumi
The online crochet community is fantastic, and YouTube is your best friend if you get stuck on any techniques. We also have a number of quick, to the point videos available through our crochet amigurumi 101 series over on Instagram. There are heaps of amazing, free patterns out there to discover; and plenty of paid ones that help support your favourite creators.
And for a final note, I should warn you, crocheting is very addictive 😉 Good luck!
No Comments