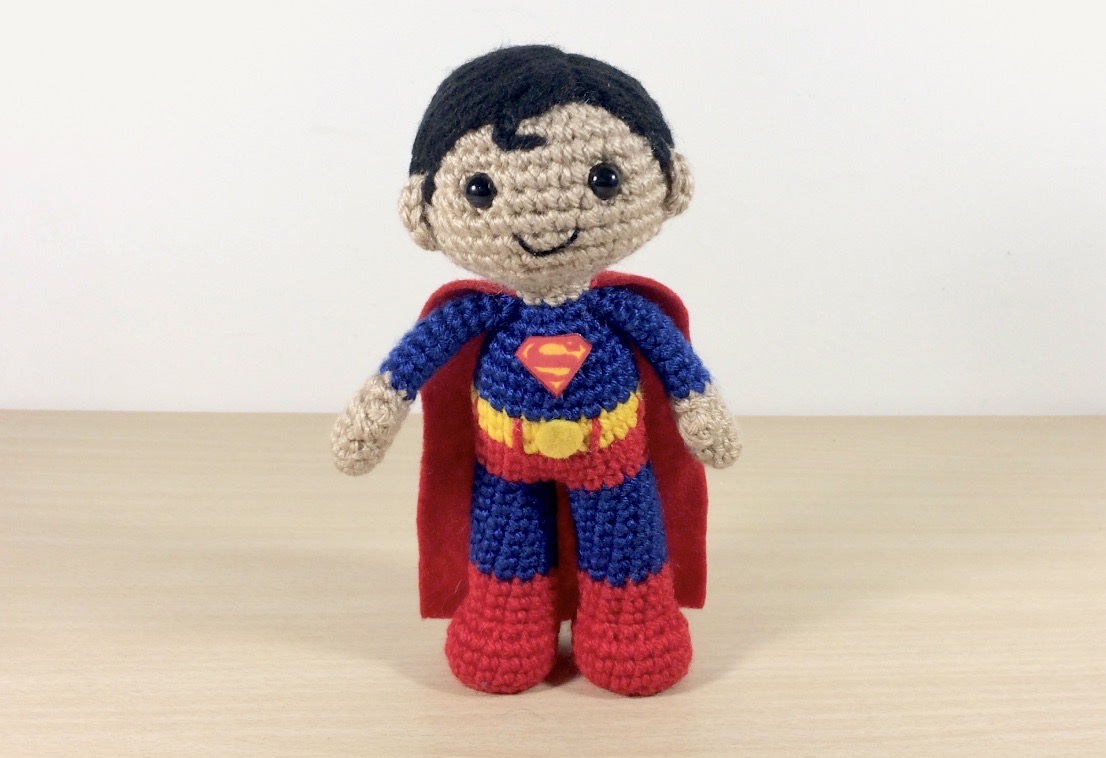
Superman was one of the very first amigurumi dolls I created, rounding out my Justice League collection. You can tell the age of the pattern in the photographs, but hopefully the pattern is clear enough to see what’s going on. This little Superman plush makes a popular gift, and he’s a nice straightforward pattern for beginners!
You can purchase a printable ad-free version of this pattern over on my Ravelry: buy now.
What materials will you need?
Note some of the links on this site are affiliate links. This means I get paid a small fee if you decide to purchase anything at no extra cost to you. I will only ever link products I happily use myself.
- Blue yarn (Stylecraft Special DK in 1831 Lapis)
- Red yarn (Stylecraft Special DK in 1246 Lipstick)
- Yellow yarn (Stylecraft Special DK in 1856 Dandelion)
- Beige yarn (Stylecraft Special DK in 1710 Stone)
- Black yarn (Stylecraft Special DK in 1002 Black)
- Yellow felt
- Red felt
- Black thread
- Iron-on transfer paper
- 3.0mm crochet hook
- Polyester filling
- 2 x 7.5mm or 8.0mm safety eyes
The yarn I use is an 8ply Australian brand with a guage of 22 stitches x 30 rows. This is equivalent to a DK yarn. When finished, your doll should be about 17.5 cm or 12 inches tall.
Quick reference for beginners
Check out some of the below tutorials if you get stuck on any of the stitches or techniques
- How to read patterns
- Magic ring
- Single crochet
- Increase
- Decrease
- How to change colours
- Attaching amigurumi limbs
- Back loop only
If you get stuck anywhere else, check out the FAQ.
Superman plush crochet pattern
HEAD
1. (in Beige) MR 6 (6)
2. [ inc ]x 6 (12)
3. [ inc, sc ]x 6 (18)
4. sc, inc, [ sc 2, inc ]x 5, sc (24)
5. [ inc, sc 3 ]x 6 (30)
6. sc 2, inc, [ sc 4, inc ]x 5, sc 2 (36)
7-12. sc 36 (36)
13. sc 2, dec, [ sc 4, dec ]x 5, sc 2 (30)
14. [ dec, sc 3 ]x 6 (24)
15. sc, dec, [ sc 2, dec ]x 5, sc (18)
Finish off, leaving a tail approximately 20cm or 7.5 inches long. Insert your safety eyes between rows 9 and 10, with approximately 5 stitches between them. Stuff firmly. Embroider the mouth using a few threads of black embroidery or cross-stitch thread.
TIP You can also use yarn to sew on the mouth, though it makes it a bit thicker. For a more expressive or detailed mouth, try felt.
HAIR CAP
1. (in Black) MR 6 (6)
2. [ inc ]x 6 (12)
3. [ inc, sc ]x 6 (18)
4. sc, inc, [ sc 2, inc ]x 5, sc (24)
5. [ inc, sc 3 ]x 6 (30)
6. sc 2, inc, [ sc 4, inc ]x 5, sc 2 (36)
7-12. sc 36 (36)
Finish off, leaving a tail approximately 20cm or 7.5 inches. Use the tail to attach the wig cap to the stuffed head. I don’t go through every stitch of the wig cap, it only needs to be secured in 4 or 5 places to hold properly.
TIP Depending on the yarn you use for the head and hair, you may need more than 12 rows, or less than 12 rows to find the right fit for the wig cap. Adjust as needed.
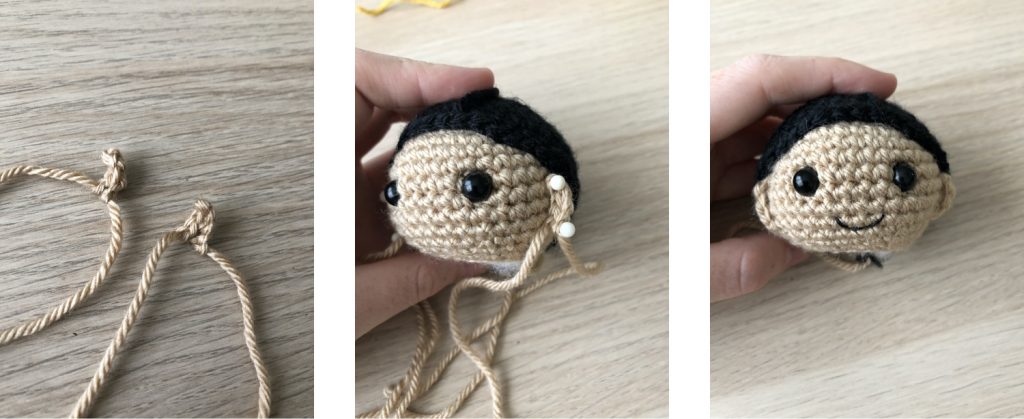
EARS (MAKE 2)
1. (in Beige) ch 3 (3)
2. ch 1, turn, sl st, sc, sl st (3)
Leave a tail for attaching to head and finish off.
Next I use pins to position the ears in place and then use the tails to attach them. I try to give them a little curve, like real ears would have. The top of the ear should be in line with the middle of the eye. It should be about 5 stitches away from the eye, or wherever it meets the edge of the wig cap.
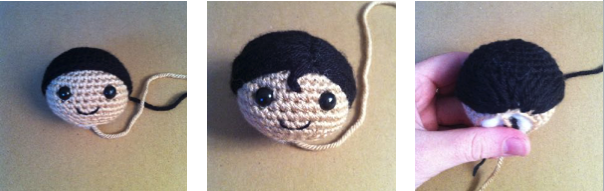
ATTACHING THE HAIR TO THE HEAD
I learnt this technique from Owlishly, so I don’t want to take any credit for it, or imagine that I can explain it better then her. Here’s the link to the tutorial: https://owlishly.typepad.com/owlishly/2007/08/amigurumi-hair.html
Use the tail of the wig cap to attach it to the head. We only need to attach it at a few places so no need to be overly thorough. You can also use the tail to start embroidering the fringe in the shape of a small curl.
ARMS (make 2)
1. (in Beige) MR 6 (6)
2. [ inc, sc 2 ]x 2 (8)
3-4. sc 8 (8)
5. 4sc popcorn, sc 7 (8)
6. sc 8 (8)
7-15. (in Blue) sc 8 (8)
Leave a tail for attaching to the body later, and finish off. They don’t need any stuffing because they’re so thin.
TIP: The popcorn stitch in the arm is the thumb. If you prefer straight arms, simply replace the popcorn stitch with a sc.
LEG (make 2)
1. (in Red) MR 6 (6)
2. [ inc ]x 6 (12)
3. [ sc, inc ]x 6 (18)
4. BLO sc 18 (18)
5-7. sc 18 (18)
8. sc 3, dec 6, sc 3 (12)
9-11. sc 12 (12)
12. (in Blue) BLO sc 12 (12)
13-19. sc 12 (12)
Finish off the first leg (no tail necessary), but leave the second one on your hook.
TIP: Crocheting one round in the back loop only makes it easier to give the foot its shape, as its easier to make the base flat.
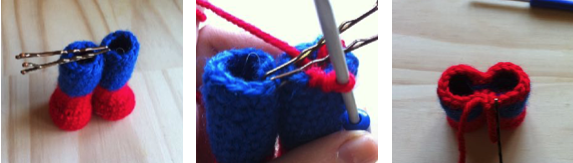
JOINING THE LEGS
Take the two legs and position them so that both feet are pointing correctly. I like to place two bobby pins across the stitches where the legs will join to make it a little easier to keep track of. The right leg should be the one still on your hook, so that the colour change at the start of the round later will be at the back of the doll.
Usually it’s four more stitches on the right leg before the fifth stitch jumps over to the left leg. Hopefully the pictures below will help illustrate.
Join with two bobby pins, this is where you’ll go from one leg to the other.
Make one sc in the right leg in the stitch the bobby pin marks. The next sc will be on the left leg, in the stitch the bobby pin marks.
Do the same when you reach the opposite bobby pin. This is what it should look like after the first round of the body.
BODY
1-3. (in Red) sc 24 (24)
4-5. (in Yellow) sc 24 (24)
6-8. (in Blue) sc 24 (24)
(at this point stuff the legs)
9. sc 3, dec, [ sc 6, dec ]x 2, sc 3 (21)
10. [ dec, sc 5 ]x 3 (18)
11. sc 2, dec [ sc 4, dec ]x 2, sc 2 (15)
12. [ dec, sc 3 ]x 3 (12)
13. (in Beige) sc 12 (12)
14. [ sc, inc ]x 6 (18)
Putting it all together
For the Superman chest insignia I print the logo onto a piece of iron-on transfer paper and iron it to a piece of red felt, which I can then trim. I glue the felt to the chest using fabric glue. If you don’t have iron on paper you could cut the ‘S’ out of red felt and the diamond shape out of yellow felt, but I found that didn’t give as much definition. You could also embroider the logo on. Iron-on transfer paper is the best solution I’ve found, although the logo is then a slightly different texture.
Using red yarn, sew on belt holders at even intervals, leaving a larger gap at the front. Also cut out a small circle using yellow felt and glue it on as a belt buckle.
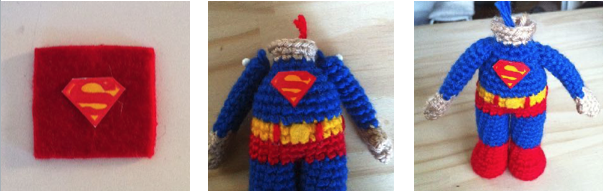
Next attach the arms. The arms are attached as a flattened piece. I pin them in place to make sure I know where they’re going. Attaching them as a ‘flattened’ piece like this makes sure the arms rest against the sides of the body.
Now for the cape; take a rectangular piece of red felt and trim it until it matches your doll. The cape will be the same approximate shape as the one pictured, however the exact dimensions are different for each doll. Customise the cape shape and size to your liking.
Then sew the cape on around the shoulders and back of the neck, I just use red yarn to do this.
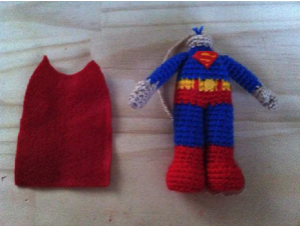
The last thing left is attaching the head. There should have been 18 stitches in the last round of the head and the body, so they match up evenly. Simple align the head properly, and whipstitch closed!

And you’re done! Your very own adorable man of steel to inspire and protect. I hope you’ve had fun with this Superman plushie, and if you make one of your own, don’t forget to tag it @53stitches so I can see 😍