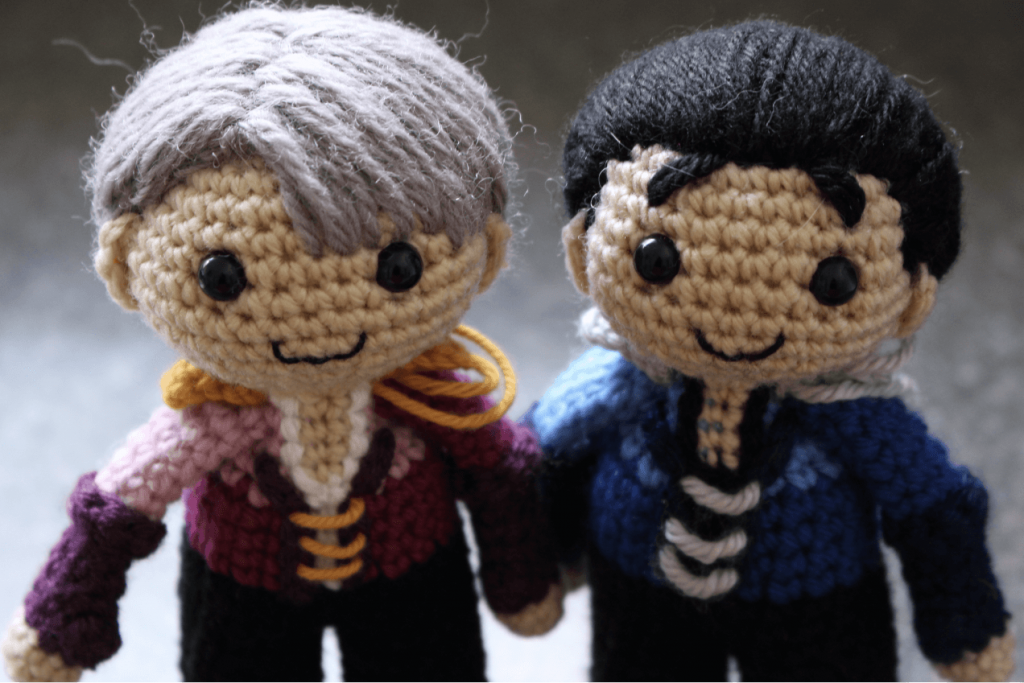
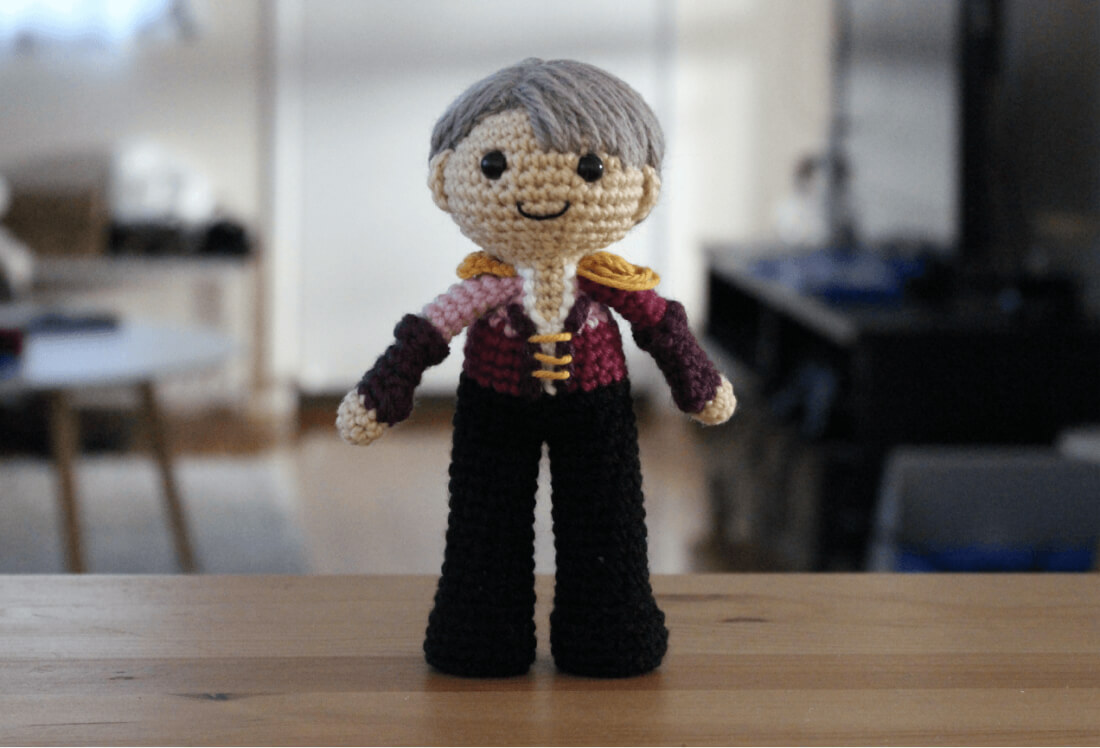
The beautiful costumes from the Yuri on Ice anime were just begging to be turned into amigurumi dolls, and who am I to resist? This Yuri crochet pattern is probably a little tricky for beginners, but if you’re ambitious don’t let me stop you! And since you can’t have just one of them, you can also find the Victor pattern over here.
You will need
- Beige yarn
- Black yarn
- Dark / navy blue yarn
- Blue yarn
- Light blue yarn
- Silver yarn
- 2 x 7.5mm safety eyes
- Polyester filling
- Yarn needle
- Black thread
- 3.00 mm crochet hook
- Fabric glue
The yarn I use is an 8ply Australian brand with a guage of 22 stitches x 30 rows. I believe this is equivalent to Double Knit (DK) with the American / UK weighting system. I have also had people tell me they’ve made the patterns with Worsted Weight yarn without issue.
The doll should be about 17.5 cm or 12 inches tall when finished, though this can change depending on how tightly you stitch compared to me 🙂
If you have any problems reading the pattern, head over to the FAQ for a description of the shorthand I use to describe the stitches, and also for a photo-illustrated PDF download of all of the basic stitches / techniques for beginners.
Yuri crochet pattern
HEAD
1. (in Beige) MR 6 (6)
2. [ inc ]x 6 (12)
3. [ inc, sc ]x 6 (18)
4. sc, inc, [ sc 2, inc ]x 5, sc (24)
5. [ inc, sc 3 ]x 6 (30)
6. sc 2, inc, [ sc 4, inc ]x 5, sc 2 (36)
7-12. sc 36 (36)
13. sc 2, dec, [ sc 4, dec ]x 5, sc 2 (30)
14. [ dec, sc 3 ]x 6 (24)
15. sc, dec, [ sc 2, dec ]x 5, sc (18)
Finish off, leaving a tail approximately 20cm or 7.5 inches long. Insert your safety eyes between rows 9 and 10, with approximately 5 stitches between them. Stuff firmly. Embroider the mouth using a few threads of black embroidery or cross-stitch thread.
TIP You can also use yarn to sew on the mouth, though it makes it a bit thicker. For a more expressive or detailed mouth, try felt.
HAIR CAP
1. (in Black) MR 6 (6)
2. [ inc ]x 6 (12)
3. [ inc, sc ]x 6 (18)
4. sc, inc, [ sc 2, inc ]x 5, sc (24)
5. [ inc, sc 3 ]x 6 (30)
6. sc 2, inc, [ sc 4, inc ]x 5, sc 2 (36)
7-12. sc 36 (36)
Finish off, leaving a tail approximately 20cm or 7.5 inches. Use the tail to attach the wig cap to the stuffed head. I don’t go through every stitch of the wig cap, it only needs to be secured in 4 or 5 places to hold properly.
TIP Depending on the yarn you use for the head and hair, you may need more than 12 rows, or less than 12 rows to find the right fit for the wig cap. Adjust as needed.
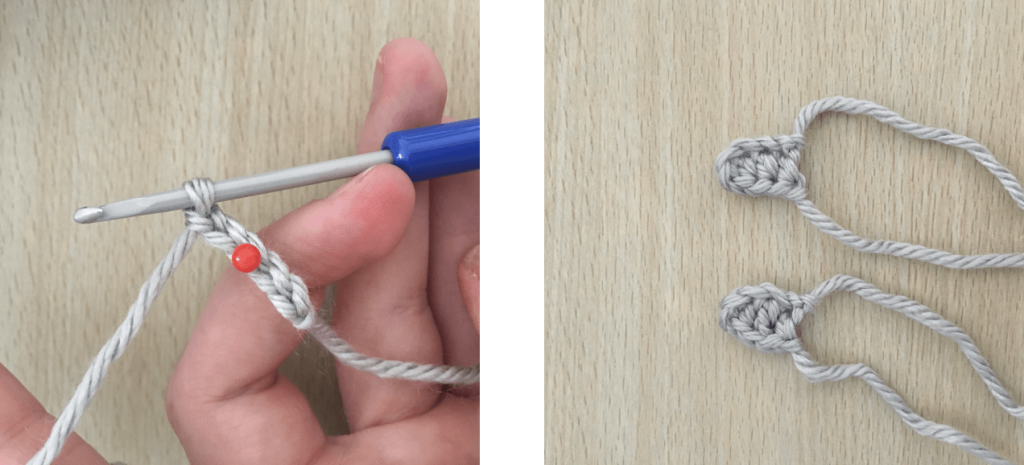
EARS (MAKE 2)
1. (in Beige) ch 3 (3)
2. ch 1, turn, sl st, sc, sl st (3)
Leave a tail for attaching to head and finish off.
Next I use pins to position the ears in place and then use the tails to attach them. I try to give them a little curve, like real ears would have. The top of the ear should be in line with the middle of the eye. It should be about 5 stitches away from the eye, or wherever it meets the edge of the wig cap.
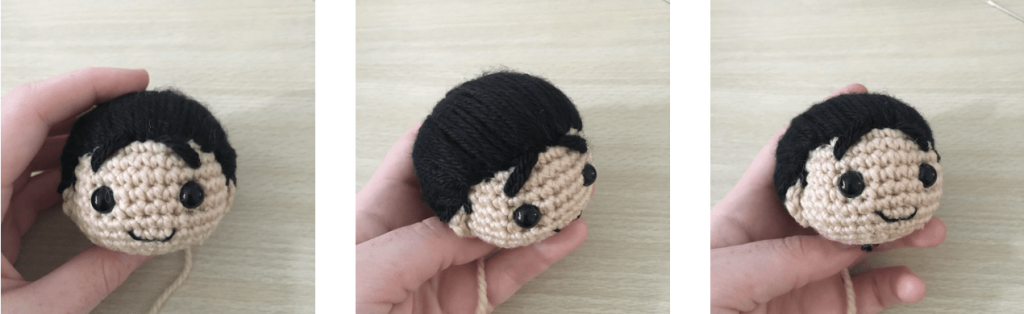
ATTACHING HAIR TO THE HEAD
The hair is embroidered on using the same black yarn you used for the wig cap. I usually do a couple of strands at the top of the head, then move to the shorter pieces of hair at the back- bottom of the head.
Owlishly has a great tutorial on embroidering hair and is where I originally learnt this technique: http://owlishly.typepad.com/owlishly/2007/08/amigurumi-hair.html

After the bottom of the head has been done and the gaps filled in, I move back to the front of the head, from the centre outwards.

For the most part it’s easier to see and imitate in pictures – and I will often pull up a reference picture of Yuri while I do this to try and recreate how his hair acts and looks. The key point is that it sweeps back from the forehead to the back of the head. I’ve tried to include plenty of pictures, though it can be difficult to see with black yarn.

I find the best way to get better at this technique is practise and to use plenty of references.
Last step after the rest of the hair is filled in is to embroider the two pieces of the fringe, and tiny sideburns.
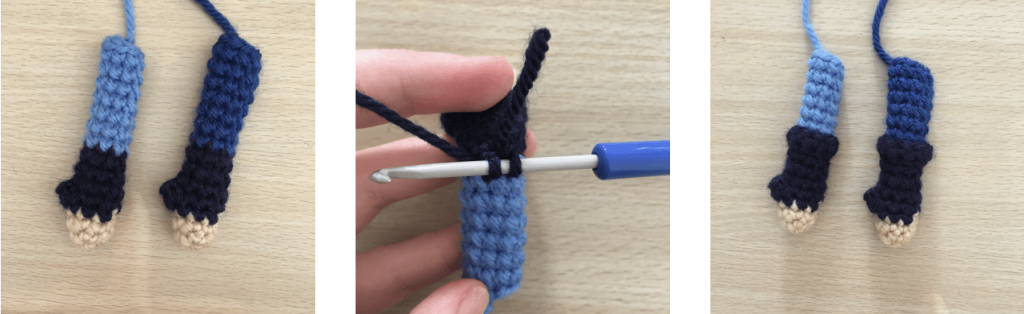
LEFT ARM
1. (in Beige) MR 6 (6)
2. [ inc, sc 2 ]x 2 (8)
3. sc 8 (8)
4. (in Dark/Navy Blue) sc 8 (8)
5. sc 3, 4sc popcorn, sc 4 (8)
6-8. sc 8 (8)
9-15. (in Light Blue) sc 8 (8)
The arms are so small there’s no need for stuffing. Leave a tail approximately 20cm or 7.5 inches long and finish off.
TIP The popcorn stitch in the arm is the thumb. If you prefer straight arms, simply replace the popcorn stitch with a sc.
RIGHT ARM
1. (in Beige) MR 6 (6)
2. [ inc, sc 2 ]x 2 (8)
3. sc 8 (8)
4. (in Dark/Navy Blue) sc 8 (8)
5. sc 3, 4sc popcorn, sc 4 (8)
6-8. sc 8 (8)
9-15. (in Blue) sc 8 (8)
Next, we’re going to pick up 2 rows of stitches around the arm in the navy blue colour, between rows 8 and 9, where it switches between navy blue and either blue or light blue yarn.
If you’ve never picked up stitches before, take a look at this guide for more in depth instructions.
ARM BAND (for both arms)
1. (in Dark/Navy Blue) pick up 8 stitches (8)
2. sc 8 (8)
LEG (MAKE 2)
1. (in Black) MR 6 (6)
2. [ inc ]x 6 (12)
3. [inc, sc ]x 6 (18)
4. BLO sc 18 (18)
5-7. sc 18 (18)
8. sc 3, dec 6, sc 3 (12)
9-19. sc 12 (12)
Finish off the first leg (no tail necessary), but leave the second one on your hook. This will make it easier to join.
TIP Crocheting one round in the back loop only makes it easier to give the foot its shape, as its easier to make the base flat.
JOINING THE LEGS
Take the two legs and position them so that both feet are pointing correctly. I like to place two bobby pins across the stitches where the legs will join to make it a little easier to keep track of. The right leg should be the one still on your hook, so that the colour change at the start of the round later will be at the back of the doll.
Usually it’s four more stitches on the right leg before the fifth stitch jumps over to the left leg. Hopefully the pictures below will help illustrate.
Join with two bobby pins, this is where you’ll go from one leg to the other.
Make one sc in the right leg in the stitch the bobby pin marks. The next sc will be on the left leg, in the stitch the bobby pin marks.
Do the same when you reach the opposite bobby pin. This is what it should look like after the first round of the body.

BODY
Be sure to read the *** warnings before you start row 4.
(row 1 is the one described above when joining the legs)
1-3. (in Black) sc (24)
4-7. (in Blue) sc 24 (24) **
(stuff the body at this point)
8. (in Light Blue) sc 3, dec [ sc 6, dec ]x 2, sc 3 (21) **
9. [ dec, sc 5 ]x 3 (18) ***
10. sc 2, dec, [ sc 4, dec ]x 2, sc 2 (15) ***
11. [dec, sc 3 ]x 3 (12) ***
12. (in Black) sc 12 (12) ***
13. (in Beige) [ sc, inc ]x 6 (18)
Finish off and stuff the rest of the body.
** These rows should have 2 stitches in Black in the middle of the body – see the pictures below
*** These rows should have 2 stitches in Beige, above the black stitches.
If one of the decreases is going to be in the middle of a colour change, just move it one stitch earlier or later in the row so that you always have those two black or beige stitches in the middle.
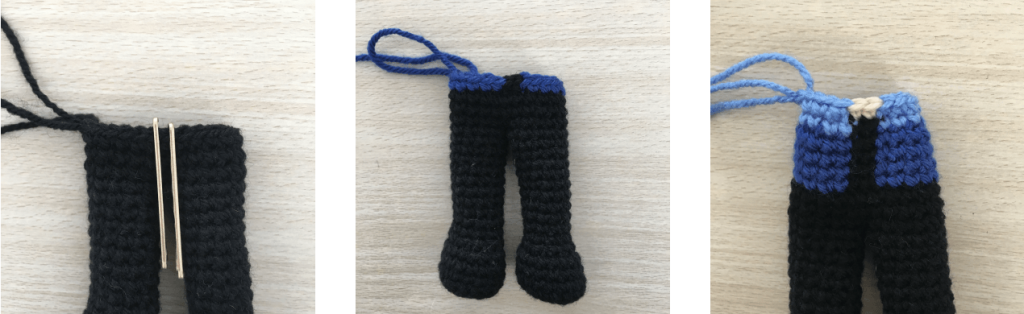
The pictures above show the two middle stitches in a different colour. I use bobby pins to find the middle stitches and mark them because it’s a bit easier. The two stitches will be in white for all of the blue rows, and the first light blue row. Then they switch to beige.

After you’ve finished the body, take a length of black yarn and embroider a line down the chest, so that the undershirt looks like it’s under the jacket.
TIP Stuff the legs before beginning the decreases. Make sure it’s not stuffed too much. You should be able to press the bottom of the feet in and have the doll stand.
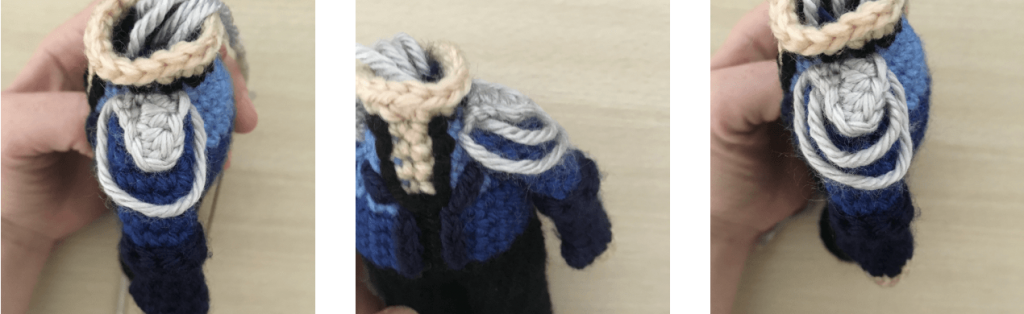
SHOULDER PADS (MAKE 2)
1. (in Silver) ch 3 (3)
2. ch 2, turn, hdc 3 (3)
* The shoulder pads should be in silver for the duet version.
Finish off, leaving a long enough tail to attach to the arm later.
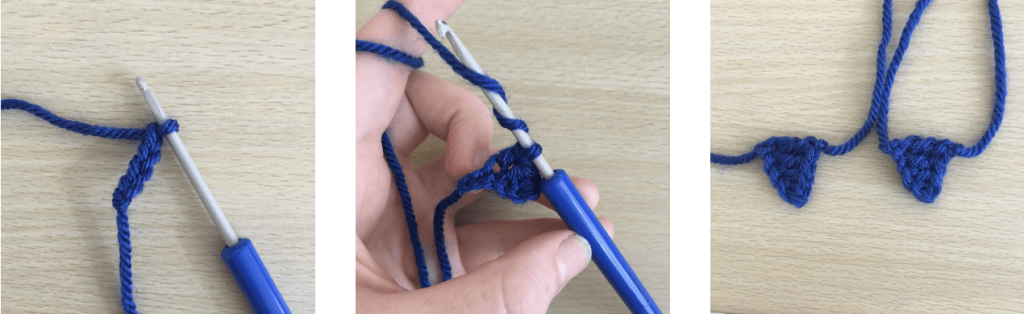
COAT TAILS (make 2)
1. (in Blue) ch 4 (4)
2. ch 1, turn, sc, hdc, dc, htc (4)
Finish off, leaving long enough tails to attach to the body later. The middle picture below shows the start of a half treble crochet – it’s like a double crochet, except at the start you wrap the yarn around your hook twice before inserting it into the stitch.
ASSEMBLY
Attach the arms. I like to pin them in place to get an idea of where they should be placed, then they are attached as a flattened piece using the tail.
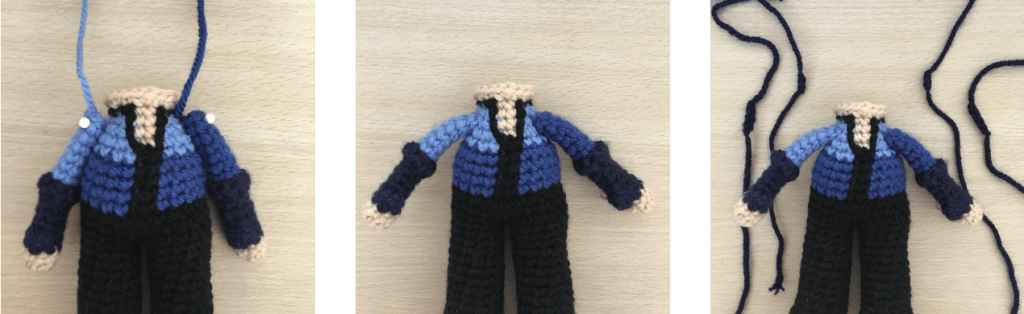
Next take the dark blue yarn again and create 4 chains:
Short Chain (make 2)
1. (in Dark/Navy Blue) ch 2 (2)
Long Chain (make 2)
1. (in Dark/Navy Blue) ch 4 (4)
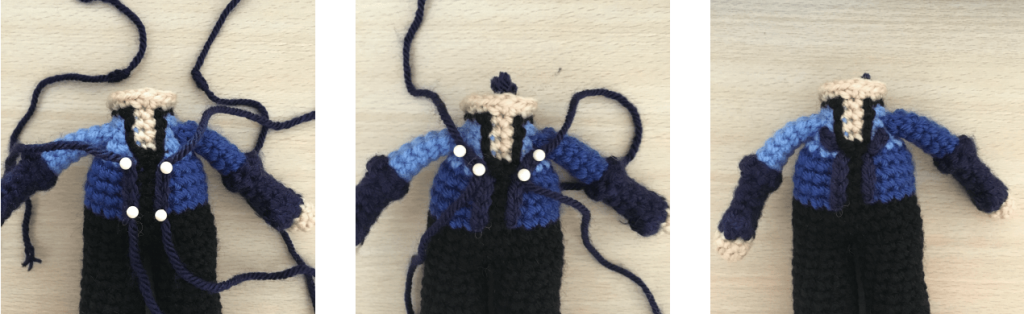
These are the collar of the jacket. The long ones go along the edge of the jacket, from the top of the pants to where the body changes to light blue. The short ones go on a slight angle, from where the long ones end towards the shoulders. See pictures below.
Attach the coat tails to the back of the doll.

Attach the shoulder pads to the arms. Then loosely embroider the two loops hanging around the left shoulder in the same colour as the shoulder pads – this part can be a bit of a pain. Just make sure to secure them tightly with knots on the inside so they can’t be pulled out.
Finally, attach the head. There should have been 18 stitches in the last round of the head and the body, so they match up evenly. Simply align the head, and whipstitch closed. I use coloured pins to mark which stitches line up at the front of the doll, and then count them out to see where to start joining at the back.

Congratulations, you’re done! He’s ready for the ice.
I hope you had fun! You can find Victor here, because you obviously have to have the two of them together <3