
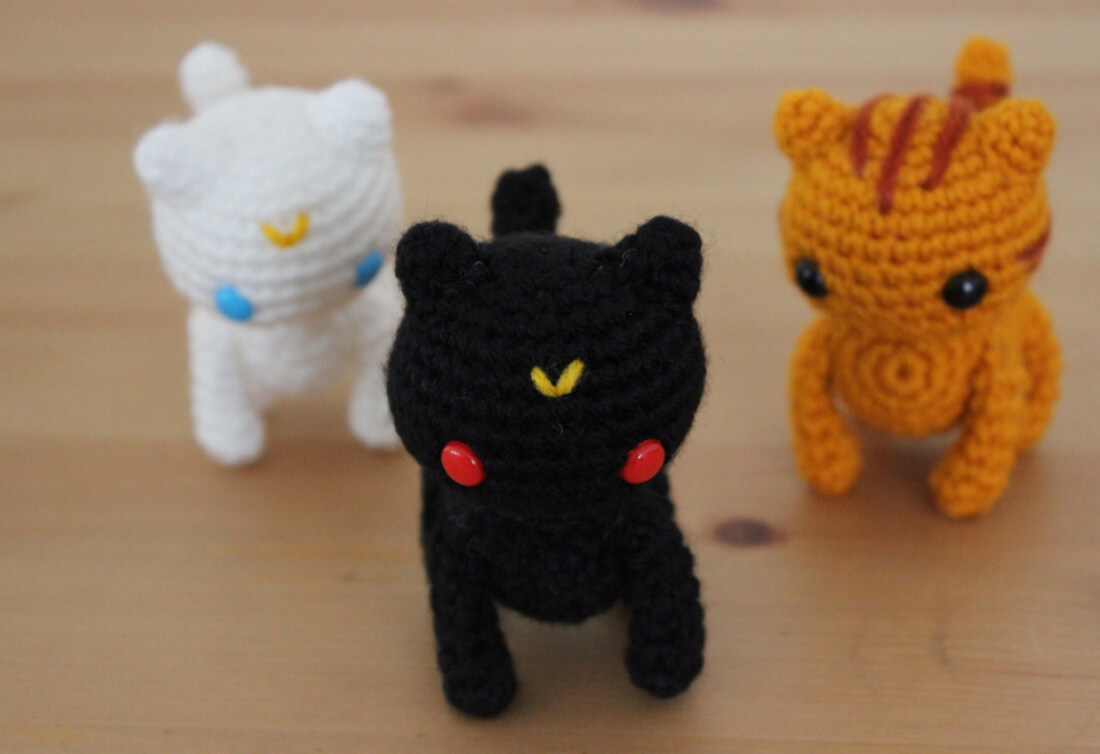
As a bona fide crazy cat lady it was only so long until I was compelled to make a cute kitty of some kind. I’ve previously made Luna and Artemis dolls in the same style I make a lot of my Pokemon, but wanted to do something with a bit more of an animal shape. I had a custom order last year for a Ser Pounce-a-Lot cat amigurumi – a character from Dragon Age. That gave me the perfect opportunity to create this free crochet cat pattern!
Meet Ser Pounce-a-Lot! The original custom order had tiny little felt armour as well, but this is just the plain ol’ cat version, since it’s a little less time consuming. I also remade Luna and Artemis using the same style, to show how cute they are, luckily there are plenty of cat characters to choose from.
This pattern is simple, though sometimes creating the small tube-like legs and tail can be a bit of a pain, and might give absolute beginners a bit of trouble – but with patience you’ll have no trouble.
What materials will you need?
Note some of the links on this site are affiliate links. This means I get paid a small fee if you decide to purchase anything at no extra cost to you. I will only ever link products I happily use myself.
- 2 x 8.00 mm safety eyes
- 3.00mm / D crochet hook
- Polyester filling
- Yarn colour of choice!
- for Ser Pounce-a-Lot I used an orange yarn with a darker orange to sew on the stripes
- Luna I used a black yarn and then sewed a crescent moon on with yellow yarn
- Artemis I used a white yarn and then sewed a crescent moon on with yellow yarn
I also ended up using coloured eyes with the Luna and Artemis dolls. I bought them from https://www.etsy.com/shop/glasseyesonline. The entire pattern is worked in the one colour – though I encourage you to experiment!
Quick reference for beginners
Check out some of the below tutorials if you get stuck on any of the stitches or techniques
- How to read patterns
- Magic ring
- Single crochet
- Increase
- Decrease
- How to change colours
- Attaching amigurumi limbs
If you get stuck anywhere else, check out the FAQ.
Free crochet cat pattern
HEAD
1. MR 6 (6)
2. inc 6 (12)
3. [ inc, sc ]x 6 (18)
4. sc, [ inc, sc 2 ]x 5, inc, sc (24)
5. [ inc, sc 3 ]x 6 (30)
6-10. sc 30 (30)
11. [ dec, sc, 3 ]x 6 (24)
12. sc, [ dec, sc 2 ]x 5, dec, sc (18)
13. [ dec, sc ]x 6 (12)
Finish off, leaving a tail for attaching to the body later. Insert the safety eyes between rows 9 and 10, with approximately 5 stitches between them. Stuff firmly.
EARS (make 2)
1. MR 5 (5)
2. inc, sc 4 (6)
3. inc, sc 5 (7)
Finish off, leaving a tail for attaching to the head.
TAIL
1. MR 6 (6)
2-10. sc 6 (6)
Finish off, leaving a tail for attaching to the body.
ARM/LEG (make 4)
1. MR 8 (8)
2. sc 8 (8)
3. dec 2, sc 4 (6)
4-7. sc 6 (6)
Finish off, leaving a tail for attaching to the body.
BODY
1. MR 6 (6)
2. inc 6 (12)
3. [ inc, sc ]x 6 (18)
4. sc, [ inc, sc 2 ]x 5, inc, sc (24)
5-6. sc 24 (24)
7. sc, [ dec, sc 2 ]x 5, dec, sc (18)
8-12. sc 18 (18)
(stuff the body at this point)
13. [ dec, sc ]x 6 (12)
14. dec 6 (6)
Finish off and close the piece.
Putting it all together

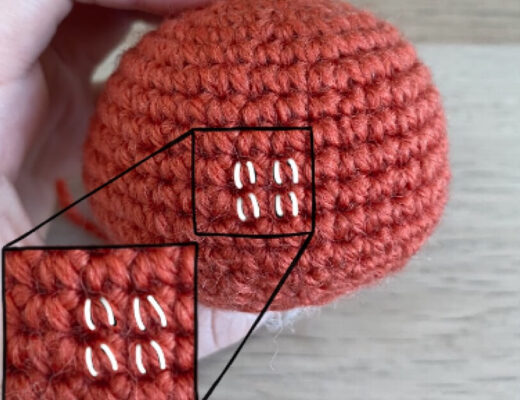
Now that we have all of the pieces crocheted it’s time to put it together. For Ser Pounce-a-Lot, or other tabbies, this is the point at which I would sew on his tail stripes. I take a length of a darker orange yarn and sew it around the tail a few times, skipping a row occasionally.


Then I pin all of the pieces together to get an idea of positioning. I attach his ears to his head first, and then sew on the stripes on his head. He gets three on the top – the middle one dips down further than the other two. Then he gets two stripes on either cheek, the top one is slightly longer than the bottom one. You could also sew him on a little pink nose at this point if you wanted to, and maybe even some whiskers.

After the head is finished I sew it onto the body. I like to sew the head on before the legs because it’s easier to position the legs around the head. Then sew on the legs and the tail – the legs can be a bit tricky, make sure that you check them as you go to make sure that he can still stand. I usually keep the pins in while I attach the pieces because I find it easier. The last step is to embroider the stripes on his back. Before you know it you’re done!

*This was the point which I added Pounce’s armour for the custom order. I just cut up a lot of triangular shaped green pieces of felt which were glued on, and then embroidered yellow yarn around the edges to create the detailing. Then I went around his arms and legs with green, yellow and brown yarn to make his little cuffs.

I will definitely be making myself a small army of these little crochet cat from this pattern, maybe a couple of mini-versions of my actual cats to keep me company at work (and if they’re anything like the real ones, knock everything off my desk).
Have you made one? Tag your work @53stitches on Instagram or Tumblr so I can check it out!


Laura Patterson
October 25, 2021 at 11:44 pmThey look so, cute, I can’t wait to make one.
Thank you for making the patterns easy to read.
Lori Mathewson
June 27, 2022 at 10:01 pmI would love to see Ser Pounce from the front with his armour on
53stitches
June 28, 2022 at 4:01 pmUnfortunately I didn’t grab enough photos of him when I had him! The little armoured version was for a custom order, so he’s long gone off to his home. A good reminder to take plenty of pictures!