

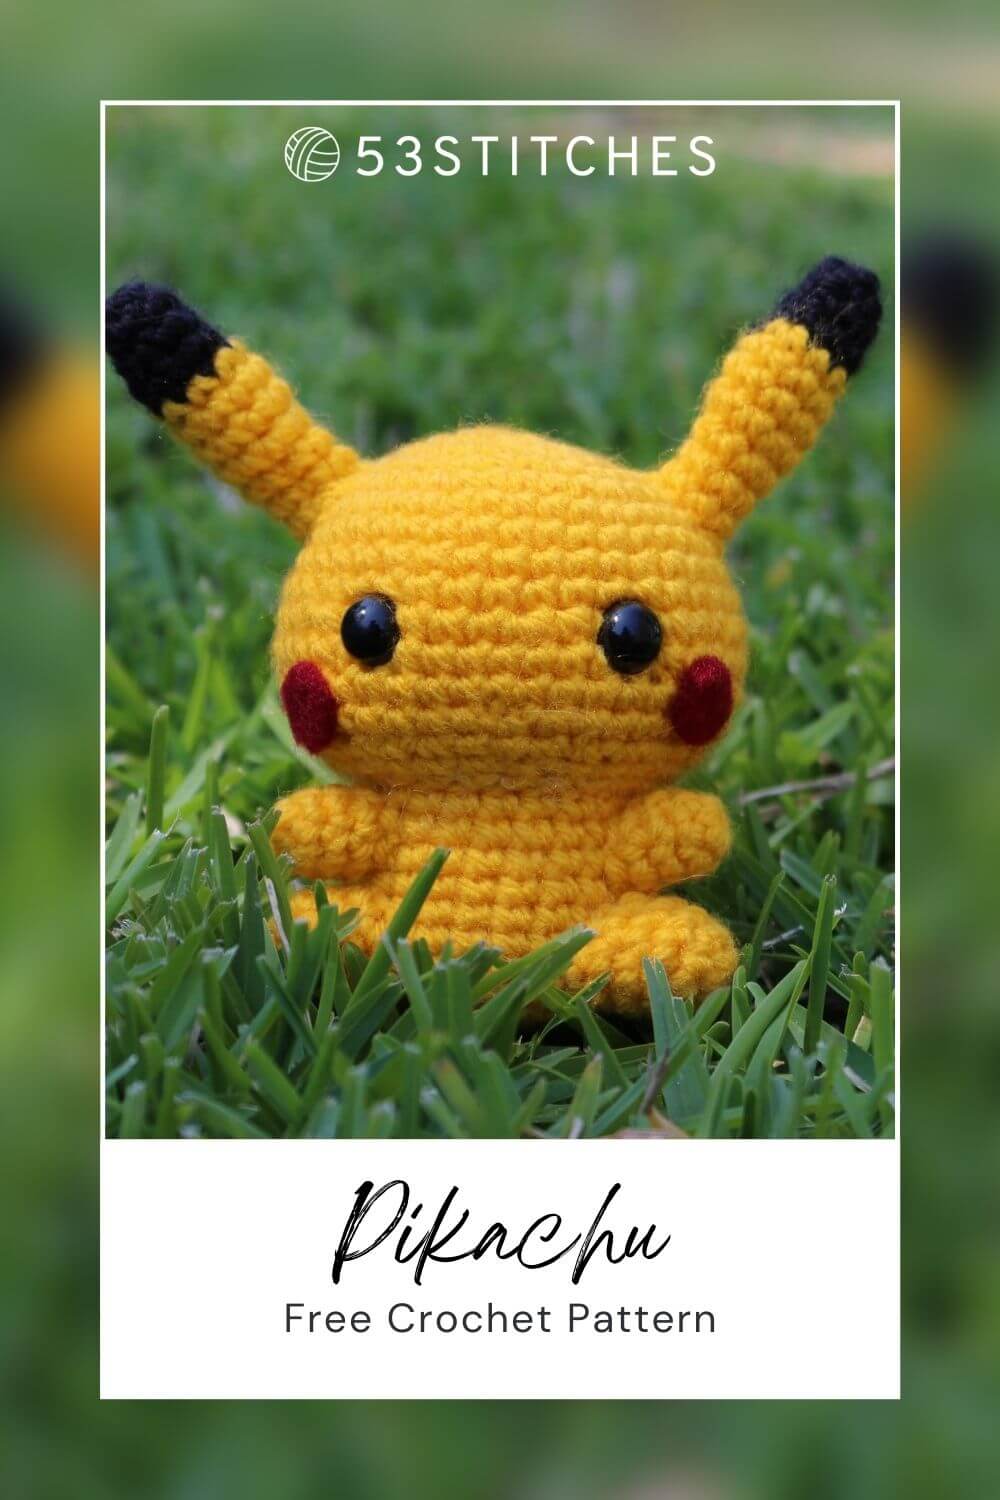
It’s finally time for Pikachu to make an appearance – sorry Ash, but we know who the real star here is. This free Pikachu crochet pattern has long been a crowd favourite. He’s the most recognisable of all of my Pokemon crochet patterns, and I love seeing him pop up all over the place as more of you make him!
Pikachu is beginner friendly, however, the tail pattern can be a bit tricky for absolute beginners or those who don’t like crocheting small pieces. To help with that, there’s a video tutorial for this pattern with plenty of tips and tricks for beginners to crochet, and some more detailed instructions on the tail. You can purchase a printable ad-free version of this pattern over on my Etsy here or Ravelry.
Video Pikachu tutorial
Skip directly to 12:07 for the tail instructions specifically, otherwise the written Pikachu pattern is below.
What you will need
I’ve added links to a Paintbox DK Cotton colours that match what I usually use to crochet Pikachu!
Note some of the links on this site are affiliate links. This means I get paid a small fee if you decide to purchase anything at no extra cost to you. I will only ever link products I happily use myself.
- 3.0mm crochet hook
- yellow yarn (Paintbox DK Cotton: 423 – Buttercup Yellow)
- black yarn (Paintbox DK Cotton: 402 – Pure Black)
- brown yarn (Paintbox DK Cotton: 411 – Coffee Bean)
- red felt
- 2 x 10mm safety eyes
- fabric glue
- polyester filling
Quick reference for beginners
Check out some of the below tutorials if you get stuck on any of the stitches or techniques
- How to read patterns
- Magic ring
- Single crochet
- Increase
- Decrease
- How to change colours
- Chain
- Slip stitch
- Double crochet
- Half double crochet
- Attaching amigurumi limbs
If you get stuck anywhere else, check out the FAQ.
Pikachu crochet pattern
HEAD
1. (in Yellow) MR 6 (6)
2. [ inc ]x 6 (12)
3. [ inc, sc ]x 6 (18)
4. sc, [ inc, sc 2 ]x 5, inc, sc (24)
5. [ inc, sc 3 ]x 6 (30)
6. sc 2, [ inc, sc 4 ]x 5, inc, sc 2 (36)
7-10. sc 36 (36)
11. [ inc, sc 5 ]x 6 (42)
12-13. sc 42 (42)
14. [ dec, sc 5 ]x 6 (36)
15. sc 2, [ dec, sc 4 ]x 5, dec, sc 2 (30)
16. [ dec, sc 3 ]x 6 (24)
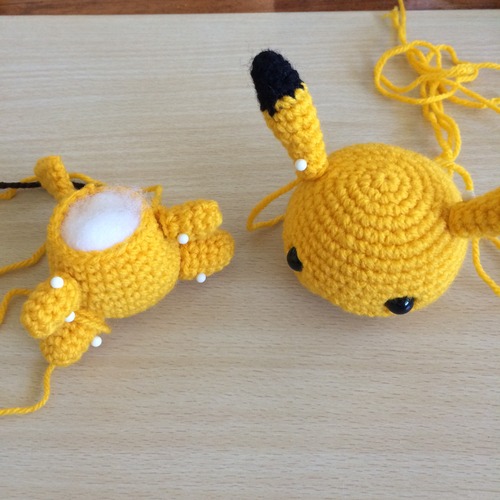
Finish off, leaving a tail for attaching later. Insert safety eyes between rows 11 and 12, with approximately 7 stitches between them.
BODY
1. (in Yellow) MR 6 (6)
2. [ inc ]x 6 (12)
3. [ inc, sc ]x 6 (18)
4. sc, [ inc, sc 2 ]x 5, inc, sc (24)
5. [ inc, sc 3 ]x 6 (30)
6-8. sc 30 (30)
9. [ dec, sc 3 ]x 6 (24)
10-12. sc 24 (24)
Finish off.
LEG (make 2)
1. (in Yellow) MR 6 (6)
2. [ inc, sc ]x 3 (9)
3-6. sc 9 (9)
Finish off, leaving a tail for attaching later.
ARM (make 2)
1. (in Yellow) MR 6 (6)
2. [ inc, sc 2 ]x 2 (8)
3-4. sc 8 (8)
5. dec, sc 6, (7)
Finish off, leaving a tail for attaching later.
EARS (make 2)
1. (in Black) MR 5 (5)
2. inc, sc 4 (6)
3. inc, sc 5 (7)
4. inc, sc 6 (8)
5. (in Yellow) inc, sc 7 (9)
6-8. sc 9 (9)
9. dec, sc 7 (8)
10-11. sc 8 (8)
Finish off, leaving a tail for attaching later.
TAIL
1. (in Yellow) ch 7 (7)
2. turn, sc 12 (6 on either side of chain) (12)
3-4. sc 12 (12)
5. sc 3, skip 6, sc 3 (6)
6. sc 6, ch 4 (10)
7. sc 1, skip 4, sc 5 (6)
8. (in Brown) sc 6 (6)
9. sc 6 (6)
Finish off, leaving a tail for attaching later.
Ok, so the tail can definitely be a bit confusing, so here’s where a bunch of images come in (or, the video at the top of the post probably does a much better job of describing it!). So the first row is simple enough, make a chain of 7. Then on the second row, turn your work, and starting in the second chain from the hook sc 6 down one side, and keep going to sc 6 up the other side as well.
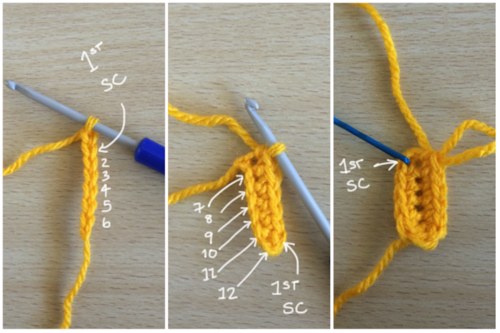
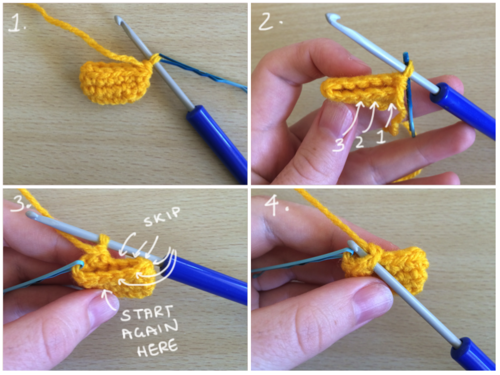
Then continue with rounds 3 and 4 normally (image 1. below). Round 5 can be a bit tricky again. This is how we’re going to create the first zig-zag. We want to go halfway and then turn the work and skip to the other side. So first sc 3 normally (image 2. below), then we’re going to pretend the next 6 stitches aren’t there. I find it easier to turn my work (image 3. below), count six stitches, and then insert my hook into the 7th stitch (image 4. below), continuing as normal for the rest of the round.
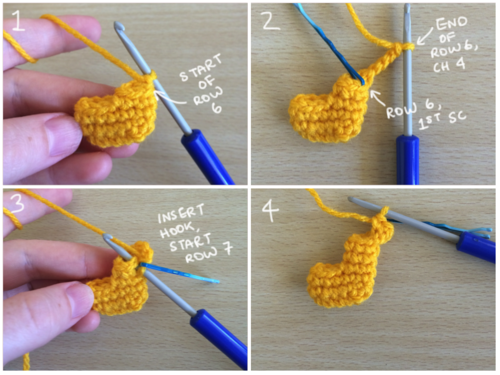
At the end of round 6 we’re going to chain 4 (image 2. below). This will become the other side of the zig zag. Chain 4, then insert your hook back into the first stitch of round six (image 3. below), like you would if there were no chain and you were simply starting round 7. Then you’ll skip stitches like you did above. When you get to where the chain 4 is you’re going to have to crochet in the front or back loop only, since there isn’t a proper sc to insert into.
After that you’ll change colour, and thankfully be done. I like to take a length of yellow yarn and whipstitch the open parts (where you skipped stitches and chained) closed to give the tail a neater shape. Hopefully that explanation wasn’t too confusing!
If it was, you can try to crochet the tail as a flat piece instead – to build up the thickness of the tail, you could make 2 of the flat versions and then stitch them together. I don’t have any pictures of this part, since it was added to the original pattern later, sorry! Note, when it says “ch 1, turn”, the next sc will be in the second chain from the hook (ie. always skip the first stitch when turning, since it’s just the chain we did at the end to get the right height).
FLAT TAIL
1. (in Yellow) ch 6
2-4. ch 1, turn, sc 6
5. ch 1, turn, sc 3
6. ch 1, turn, sc 3, ch 2
7-8. ch 1, turn, sc 5
9. ch 1, turn, sc 2
10-11. (in Brown) ch 1, turn sc 2
Finish off, leaving a long enough tail to attach to the body.

Press the tail flat and that’s the end of all the crocheting! Stuff the head, body, and legs. The legs don’t require much stuffing. Everything is ready for assembly.
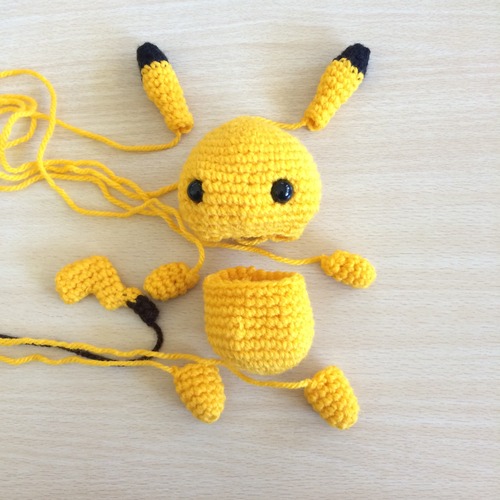
Putting everything together
I find it easier to pin all the pieces together to make sure they’re positioned properly when before I attach them. You can attach them in whatever order you choose, but I usually find them easiest to attach in this order: legs, tail (stitch on back detail), arms, head, ears. Attaching the head before the ears makes it easier to ensure the ears are even.
After you’ve attached the tail, but before you attach the head, make sure you remember to embroider on the two stripes Pikachu has at the back. I usually use the same yarn I’m using to attach the tail to the body.
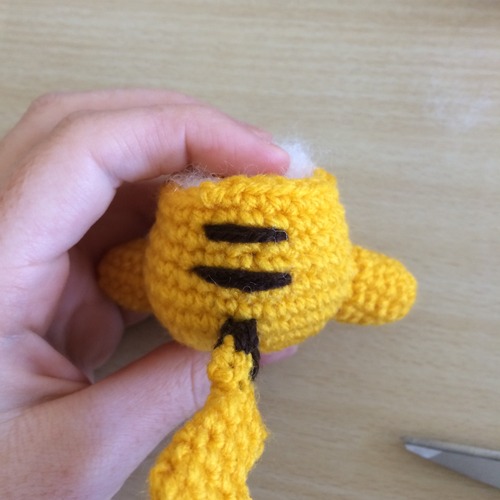
The last thing left to do is the cheeks! Take a piece of red felt, and cut out two small circles. Then simply glue them in place underneath the eyes.
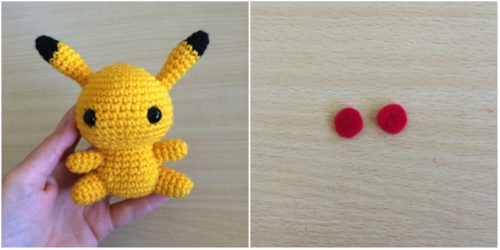
Done!
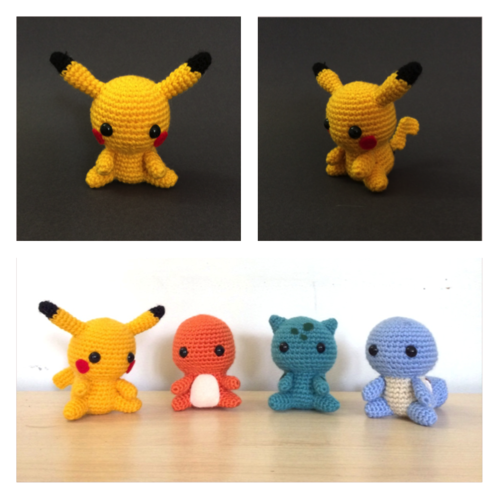
Your finished crochet Pikachu!
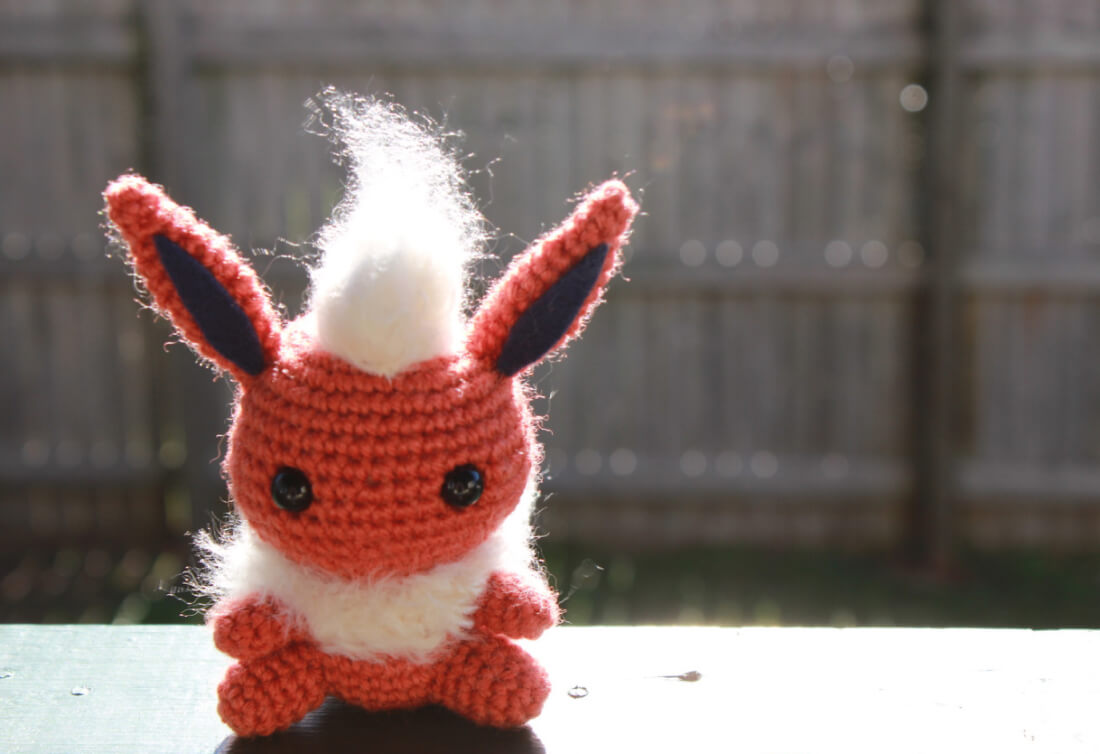
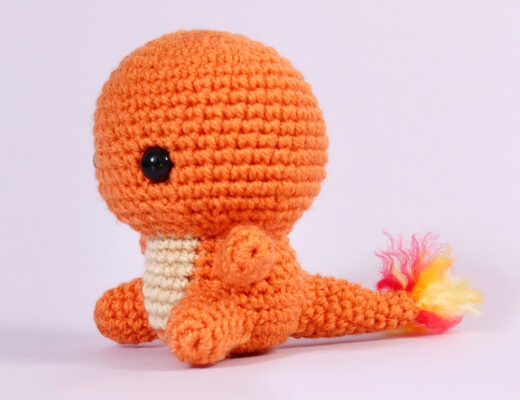
He looks great alongside the others. If you haven’t already checked them out, you can find the patterns here for Charmander, Bulbasaur and Squirtle to complete your own collection too! And an easy to save Pinterest graphic, if you love organising your craft projects through Pinterest like I do.
I hope you had a great time following this Pikachu crochet pattern, and if you share your projects on Instagram or Tumblr be sure to tag @53stitches so I can check them out!
I think Pikachu is my favourite Pokemon crochet amigurumi so far, his little cheeks are so adorable and his ears make him much more photogenic than the others. If you end up making this doll, I’d love to see it! I follow the #53stitches tag on Instagram and tumblr.

Jodi
May 10, 2021 at 12:08 pmI just made this for my son. It turned out great. Thanks for the great pattern. I’m definitely a beginner and this was very easy to follow. Thanks!
Dani
June 24, 2021 at 6:29 amLove your instructions and patterns ! Thankyou
Sarah
August 4, 2021 at 2:40 amGreat pattern, easy to follow. Thank you for the tutorial video for the tail. That helped everything make a lot more sense. My daughter is going to freak when she sees this
ivee :)
October 16, 2021 at 10:09 pmI LOVE IT!! Its so cute, thanks a lot for this adorable pikachu pattern. ❤❤❤
Helena
April 5, 2022 at 1:46 amHonestly, the best instructions. Thank you so much – You really helped me to understand 🙂
Rebecca
July 3, 2022 at 11:54 pmYour Pokémon Amigurumi are my absolute favorite! Well written patterns and super cute results. Thank you so much for sharing these.