
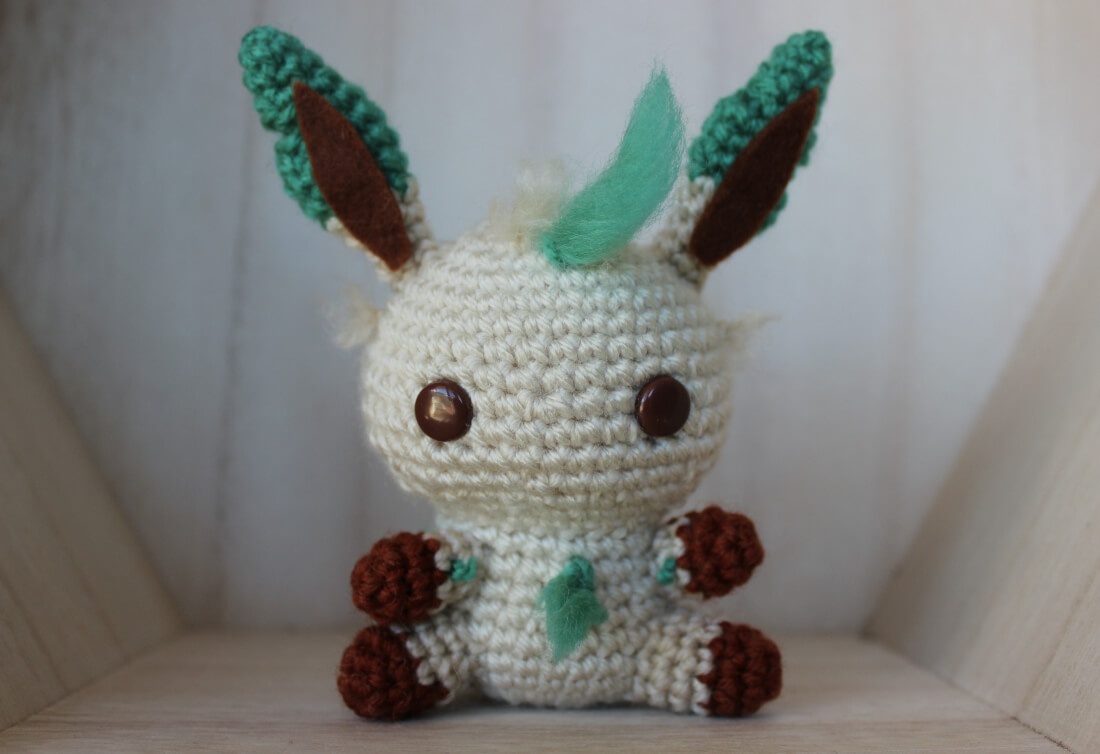
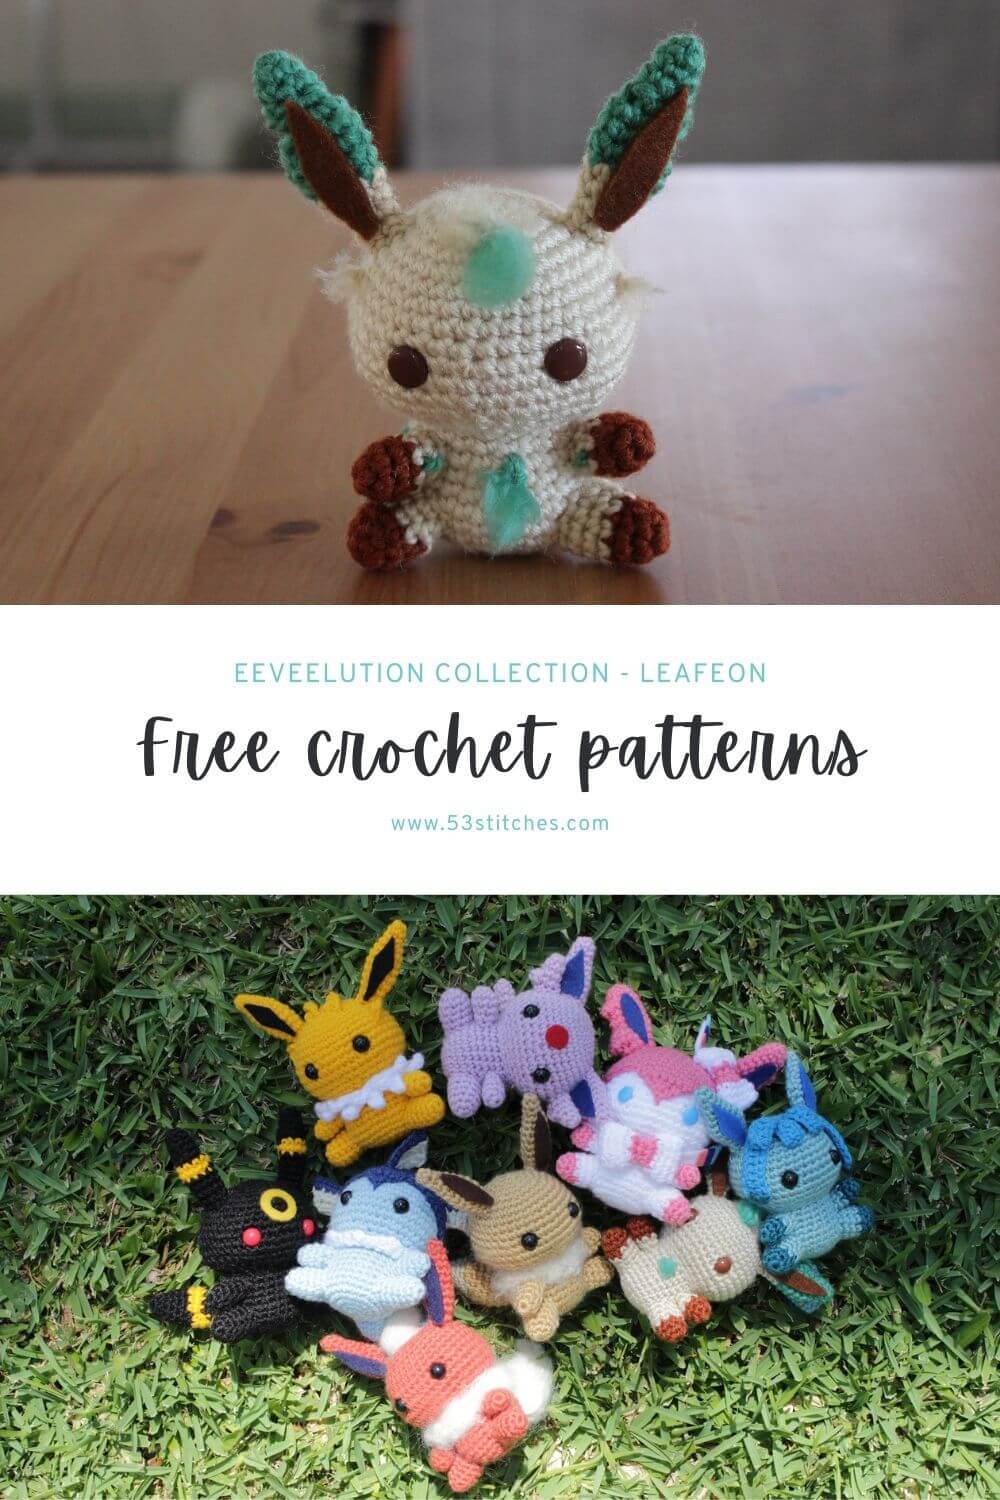
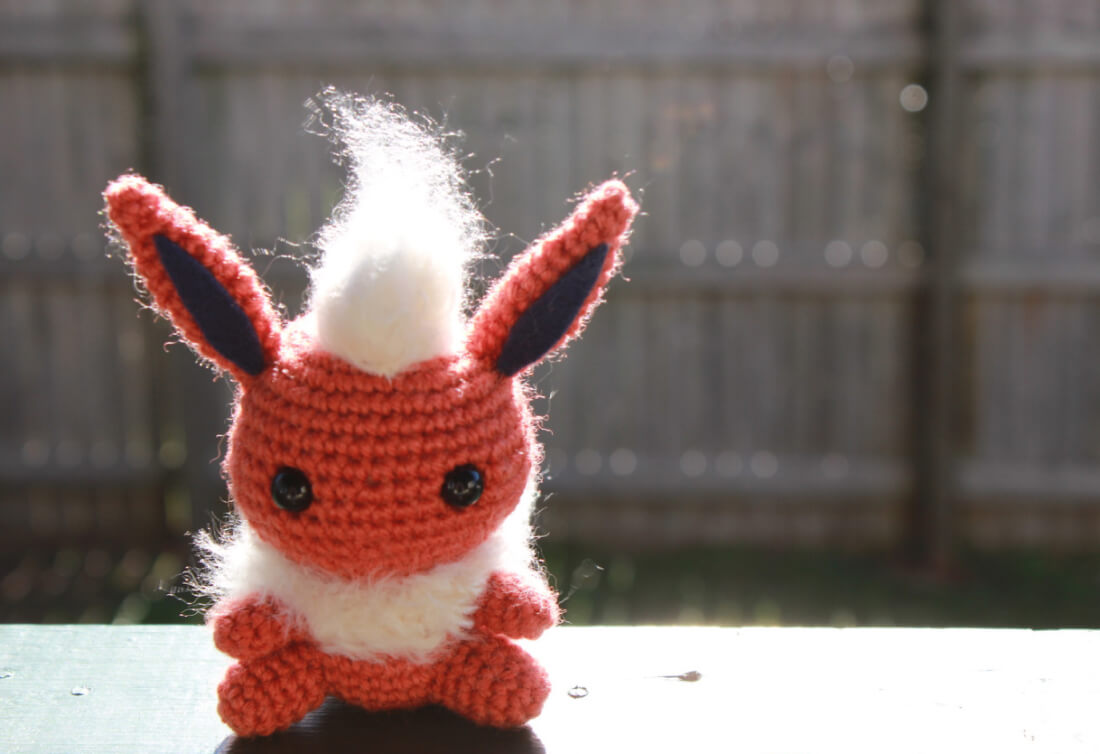
I’ve never actually played the generation of Pokemon games that Leafeon and Glaceon are from, but I absolutely love the colours on Leafeon, so here they are! It was a fun challenge trying to work out a technique to get the leaf-like notches in the ear and the tail. Enjoy the free Leafeon crochet pattern!
You can purchase and ad-free PDF of this pattern over on my Ravelry or Etsy, and if you do a huge thank-you in advance for your wonderful support! You can also find a diy crochet kit on my Etsy which has all the materials you need to make your own!
What materials will you need?
Note some of the links on this site are affiliate links. This means I get paid a small fee if you decide to purchase anything at no extra cost to you. I will only ever link products I happily use myself.
- 3.00 mm crochet hook
- yarn needle
- polyester filling
- glue
- brown felt
- green yarn
- cream yarn
- brown yarn
- 2 x 10mm safety eyes
I managed to find some really pretty brown safety eyes for this doll from glasseyesonline – I’ve been trying to find solidly coloured safety eyes for a long time, but only ever managed to find red ones. The place I found these ones has red, yellow, blue, brown, green and more! I grabbed a bunch of them.
Quick reference for beginners
Check out some of the below tutorials if you get stuck on any of the stitches or techniques
- How to read patterns
- Magic ring
- Single crochet
- Increase
- Decrease
- Chain
- How to change colours
- Attaching amigurumi limbs
If you get stuck anywhere else, check out the FAQ.
Crochet Leafeon pattern
HEAD
1. (in Cream) MR 6 (6)
2. [ inc ]x 6 (12)
3. [ inc, sc ]x 6 (18)
4. sc, [ inc, sc 2 ]x 5, inc, sc (24)
5. [ inc, sc 3 ]x 6 (30)
6. sc 2, [ inc, sc 4 ]x 5, inc, sc 2 (36)
7-10. sc 36 (36)
11. [ inc, sc 5 ]x 6 (42)
12-13. sc 42 (42)
14. [ dec, sc 5 ]x 6 (36)
15. sc 2, [ dec, sc 4 ]x 5, dec, sc 2 (30)
16. [ dec, sc 3 ]x 6 (24)
Finish off, leaving a tail long enough to attach to the head later.
BODY
1. (in Cream) MR 6 (6)
2. [ inc ]x 6 (12)
3. [ inc, sc ]x 6 (18)
4. sc, [ inc, sc 2 ]x 5, inc, sc (24)
5. [ inc, sc 3 ]x 6 (30)
6-8. sc 30 (30)
9. [ dec, sc 3 ]x 6 (24)
10-12. sc 24 (24)
Finish off, there’s no need to leave a tail.
LEG (make 2)
1. (in Brown) MR 6 (6)
2. [ inc, sc ]x 3 (9)
3. sc 9 (9)
4-6. (in Cream) sc 9 (9)
Finish off, leaving a tail long enough to attach to the body later.
ARM (make 2)
1. (in Brown) MR 6 (6)
2. [ inc, sc 2 ]x 2 (8)
3. sc 8 (8)
4. (in Cream) sc 8 (8)
5. dec, sc 6, (7)
Finish off, leaving a tail long enough to attach to the body later.
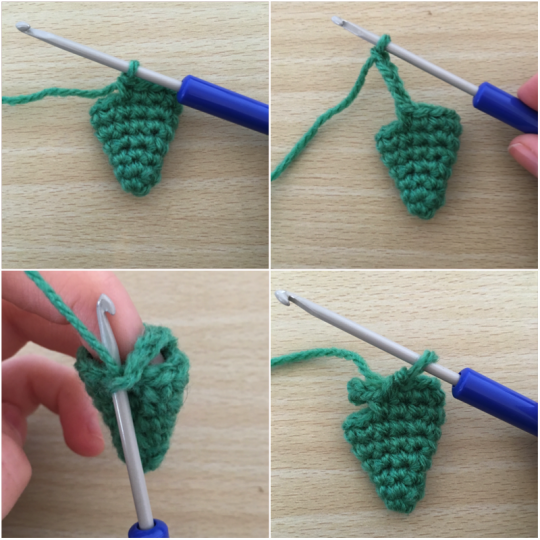
The ears and tail can start to get tricky with skipped stitches, so I’ve got some photos if you’re struggling.
To create the notches in the tail and ears, we’re going to chain and skip a few stitches. You want to try and position the notch so that it’s at the edge of the ear. When you reach the chains in round 8 of the tail, press the piece flat so that the next four stitches (which we’ll be skipping) are at the edge of the ear (two on either side). Then chain 4. The next sc will be worked into the tail again, but it will be the 5th stitch from the start of round 8. The picture in the bottom left shows what the tail looks like after row 8 has been finished.
TAIL
1. (in Green) MR 4 (4)
2. [ inc, sc ]x 2 (6)
3. sc 6 (6)
4. [ inc, sc ]x 3 (9)
5. sc 9 (9)
6. [ inc, sc 2 ]x 3 (12)
7. sc 12 (12)
8. ch 4, skip 4, sc 8 (12)
9. sc 12 (12)
10. dec, sc 2, dec, ch 3, skip 3, dec, sc (9)
11. sc 9 (9)
12. (in Cream) [ dec, sc ]x 3 (6)
13. sc 6 (6)
Finish off, leaving a tail long enough to attach to the body later.
RIGHT EAR
1. (in Green) MR 4 (4)
2. [ inc, sc ]x 2 (6)
3. sc 6 (6)
4. [ inc, sc 2 ]x 2 (8)
5. inc, ch 2, skip 2, sc, inc, sc 3 (10)
6. sc 7, ch 3, skip 3 (10)
7-8. sc 10 (10)
9. (in Cream) [ dec, sc 3 ]x 2 (8)
10. sc 8 (8)
11. [ dec, sc 2 ]x 2 (6)
12. sc 6 (6)
Finish off, leaving a tail long enough to attach to the head later.
LEFT EAR
1. (in Green) MR 4 (4)
2. [ inc, sc ] x 2 (6)
3. sc 6 (6)
4. inc, sc 2, inc, ch 2, skip 2 (8)
5. inc, ch 3, skip 3, inc, sc 3 (10)
6-8. sc 10 (10)
9. (in Cream)[ dec, sc 3 ]x 2 (8)
10. sc 8 (8)
11. [ dec, sc 2 ]x 2 (6)
12. sc 6 (6)
The left ear has the notches in slightly different locations, just to make the ears a little less symmetrical! Finish off and leave a tail long enough to attach to the head later.
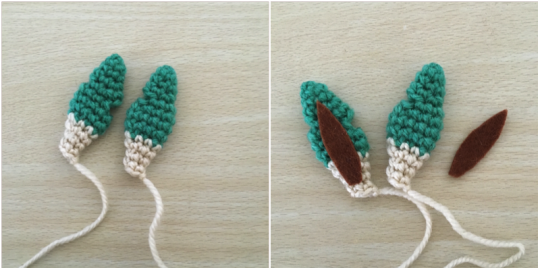
Get some brown felt and cut out a pointed oval shape for the inside of the ears. Then glue in place.
Putting it all together
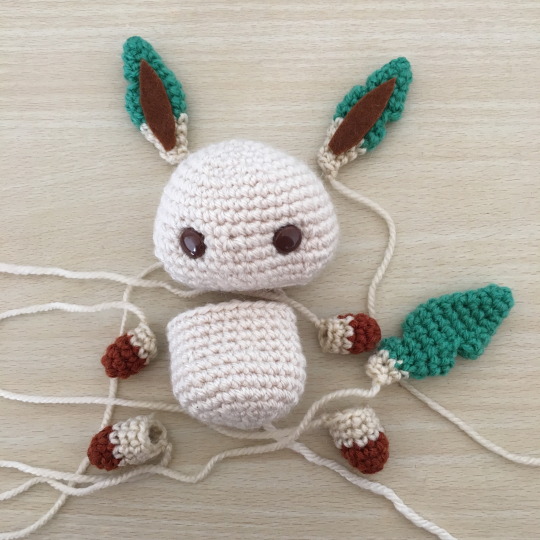
And that’s all of the crocheting done!
Now onto assembly. Stuff the head, body and legs. I find the arms are so small that they don’t need any stuffing, and the ears and tail are pressed flat, so they don’t need to be stuffed either.
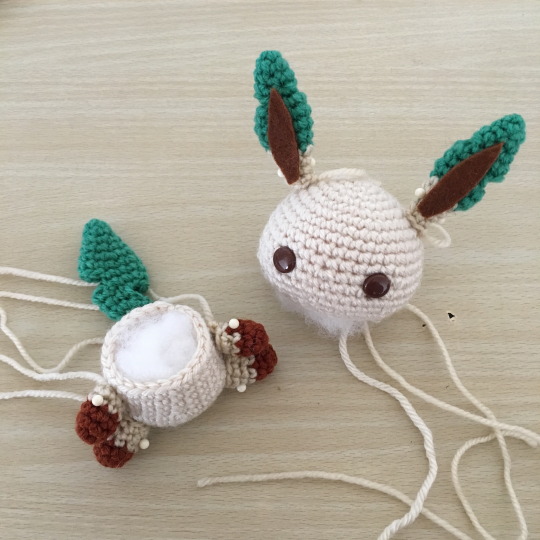
I like to pin all of the pieces in place to make sure of placement before I get started, and to make it a little bit easier to make sure everything stays where I’ve planned it to go while I’m sewing. If you’re unsure of how to attach pieces, have a look at the great tutorials that Planet June offers – I still use the techniques I learnt from her when I started crocheting.
I usually attach all of the pieces in the following order: legs to body, tail to body, arms to body, ears to head, and then finally, head to body. For this particular doll though, we don’t want to rush into attaching the head just yet.
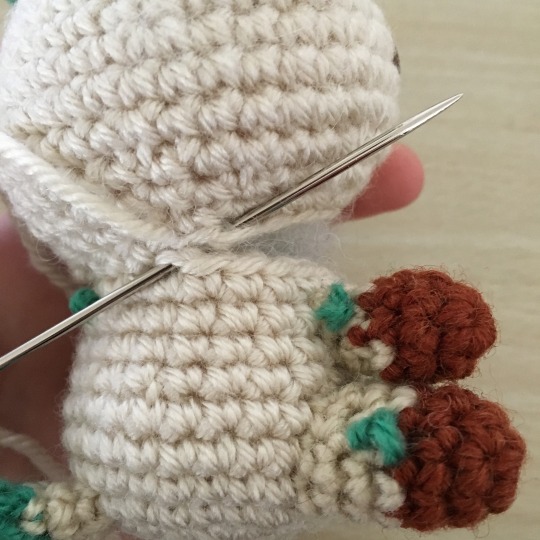
Once you have the arms and legs attached to the body, take a length of green yarn and embroider on some of the flicking leaf detailing that Leafeon has. I usually just poke the needle through the body and out the arm, then knot the yarn loosely to give it a bit of volume, and pull it back through. Hopefully you can see what I’m talking about in the pictures. I usually do one or two on opposite sides of each arm and leg, but hey, feel free to mix it up – I’m sure not every Leafeon in the Pokemon world is exactly alike.

For the fluffy green part on the chest, cut a short length of green yarn and latch it onto the chest. Similarly to how we’ve attached Eevee’s collar or Charmanders tail in previous patterns. Then, as with those patterns, take a metal pet brush or comb, brush out the green yarn until fluffy, and then twist it to help it keep its curly, pointy shape. For an even neater look where it attaches, needle felt the end in place on the chest (I’m not sure how secure this would be though).

Then we want to do the same attaching/brushing out/twisting to shape method with the larger fluffy hair-do on the top of Leafeon’s head, as well as the smaller pieces in the same cream used on the doll at the top of the head and below the ears. The red pins mark the cream coloured yarn, and the green pin will be green.

Once you’ve got those shaped the way you like, it’s time to attach the head. Both the head and the body had 24 stitches in their last rows, so all you need to do is align the head with the body and whipstitch closed. I often get halfway and realise that the head is very crooked at the front – that’s fine, undo the stitches, adjust the head, and try try again!
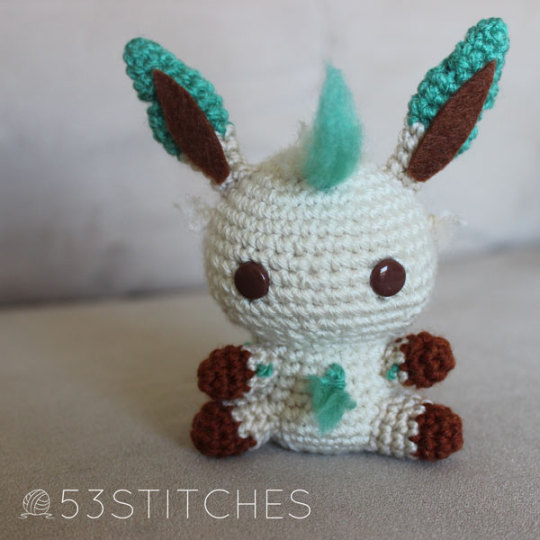
And that’s Leafeon done! Despite how long it took me to get this one out, I enjoyed it a lot more than Glaceon, and unexpectedly really loved how the colour combination looks.
As always, if you share on Instagram or Tumblr, don’t forget to tag @53stitches so I can check it out! I love seeing how creative everyone gets.
Other Pokemon crochet patterns
Haven’t had enough? The rest of the Eeveelution collection is linked below so you can easily jump to the next one:
Vaporeon | Jolteon | Flareon | Umbreon | Espeon | Eevee | Glaceon | Sylveon
You can also check out my other Pokemon crochet patterns here.


Oliver
March 17, 2023 at 8:09 amSuper cute! My friend loves Leafeon so I knew I had to make one for her. My friend loves it! Turned out super cute! So cute I decided to make one for myself. Great pattern and so happy it was free! I will definitely make more leafeon and will use more patterns from this site. Ears and tail are tricky so I wouldn’t recommend it to a beginner. If you have crocheted before this is a super cute and fun kit to do.