
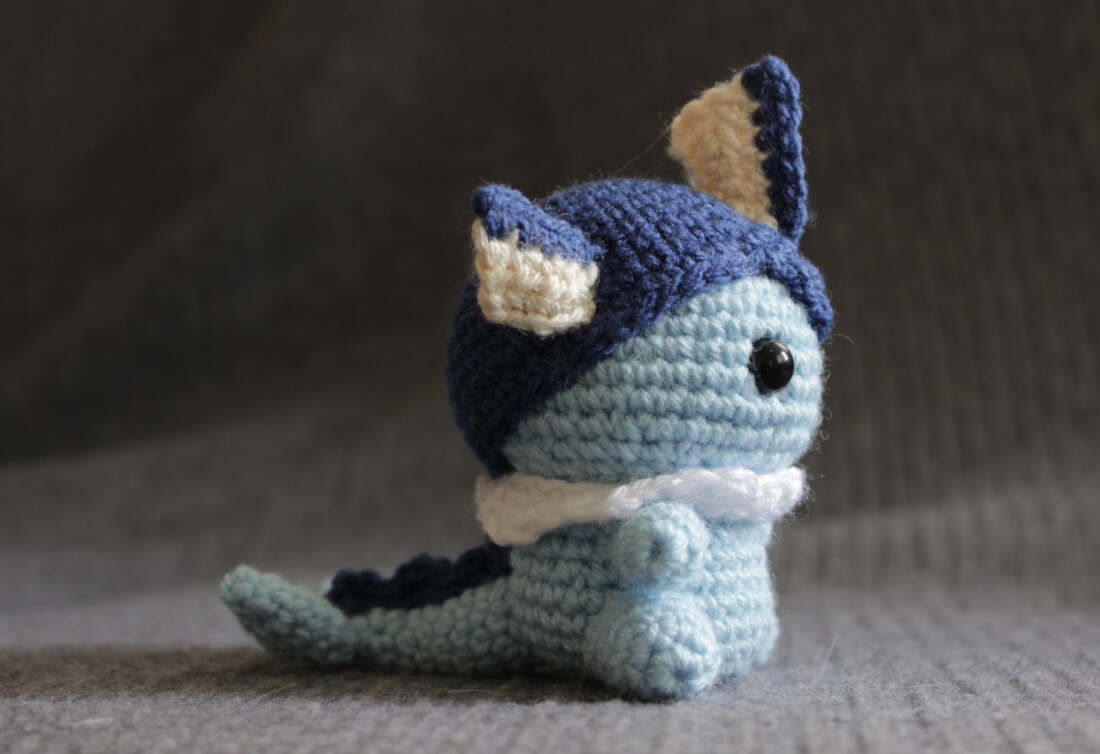
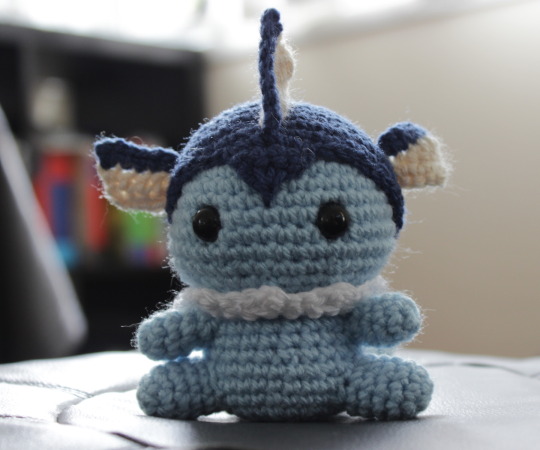
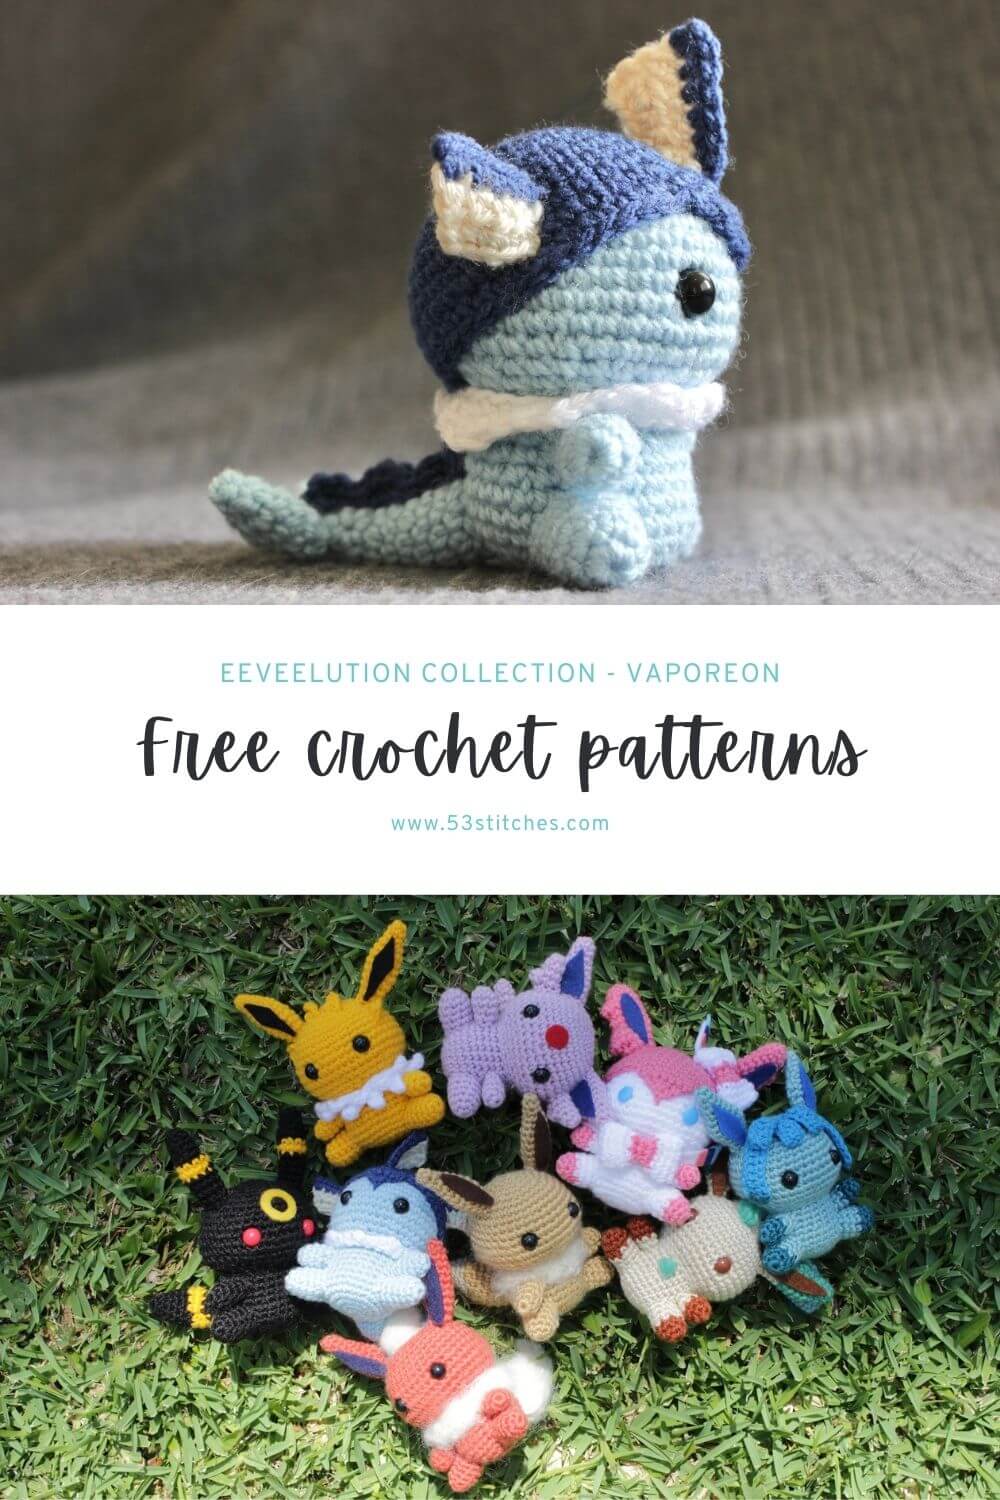
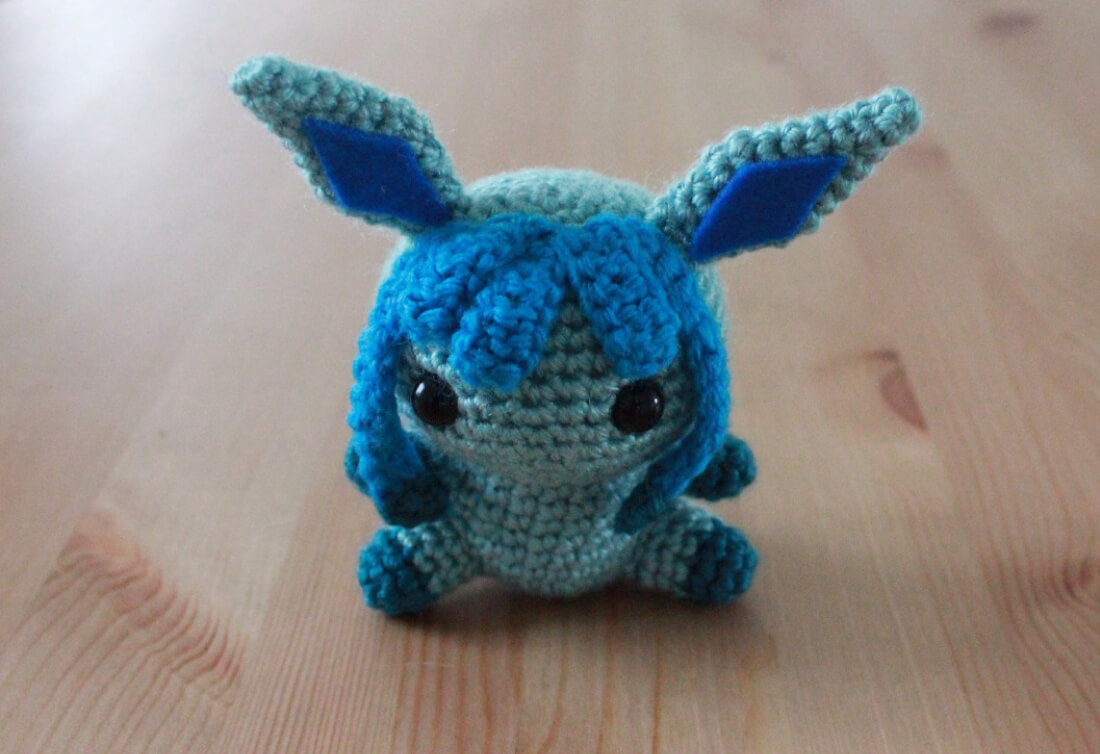
At long last, the Vaporeon crochet pattern joins the other Eeveelutions. I put Vaporeon off for so long because I thought it was going to be really tricky to work out the fins and the collar. As it turns out, they were some of the most fun to create! Vaporeon feels quite different to the rest of the Eeveelutions (or at least, it did until Sylveon came along) but I really love the design.
Thanks for all of your wonderful comments and love I’ve gottten for these Pokemon crochet patterns! I hope you enjoy Vaporeon too. You can purchase and ad-free PDF of this pattern over on my Ravelry or Etsy, and if you do a huge thank-you in advance for your wonderful support! You can also find a diy crochet kit on my Etsy which has all the materials you need to make your own!
What materials will you need
Note some of the links on this site are affiliate links. This means I get paid a small fee if you decide to purchase anything at no extra cost to you. I will only ever link products I happily use myself.
- 3.00 mm crochet hook
- 2x 10.00mm safety eyes
- Dark blue yarn
- Light blue yarn
- White yarn
- Butter/cream yarn
- Polyester filling
- Yarn needle
Quick reference for beginners
Check out some of the below tutorials if you get stuck on any of the stitches or techniques
- How to read patterns
- Magic ring
- Single crochet
- Increase
- Decrease
- How to change colours
- Chain
- Slip stitch
- Double crochet
- Half double crochet
- Attaching amigurumi limbs
If you get stuck anywhere else, check out the FAQ.
Crochet Vaporeon pattern
HEAD
1. (in Light Blue) MR 6 (6)
2. [ inc ]x 6 (12)
3. [ inc, sc ]x 6 (18)
4. sc, [ inc, sc 2 ]x 5, inc, sc (24)
5. [ inc, sc 3 ]x 6 (30)
6. sc 2, [ inc, sc 4 ]x 5, inc, sc 2 (36)
7-10. sc 36 (36)
11. [ inc, sc 5 ]x 6 (42)
12-13. sc 42 (42)
14. [ dec, sc 5 ]x 6 (36)
15. sc 2, [ dec, sc 4 ]x 5, dec, sc 2 (30)
16. [ dec, sc 3 ]x 6 (24)
Finish off, leaving a tail for attaching to the body later. Insert safety eyes between rows 11 and 12, with approximately 7 stitches between them. Stuff firmly.
CAP
1. (in Dark Blue) MR 6 (6)
2. [ inc ]x 6 (12)
3. [ inc, sc ]x 6 (18)
4. sc, [ inc, sc 2 ]x 5, inc, sc (24)
5. [ inc, sc 3 ]x 6 (30)
6. sc 2, [ inc, sc 4 ]x 5, inc, sc 2 (36)
7-10. sc 36 (36)
11. [ inc, sc 5 ]x 6 (42)
12-13. sc 42 (42)
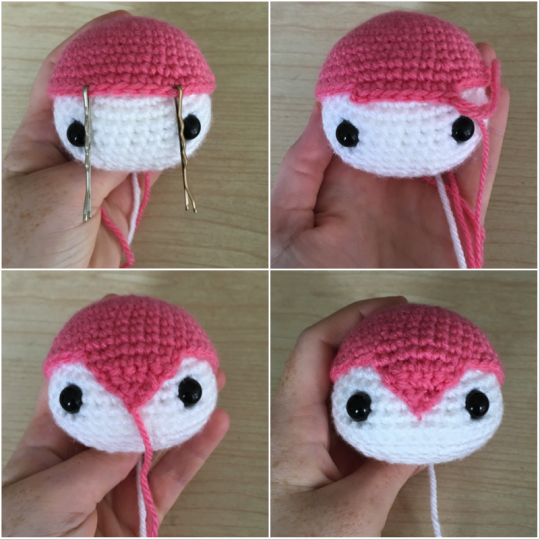
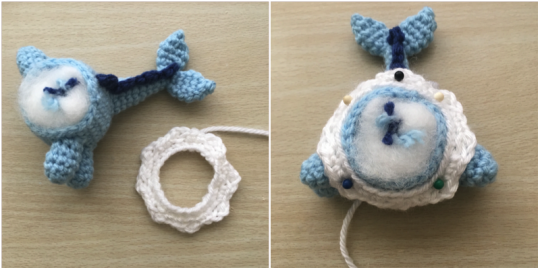
Finish off, leaving a tail to attach to the head – but we’re not done yet. I forgot to take pictures of this bit, so I’ll use the same ones I used for Sylveon – I love how the different Eeveelutions share a lot of the same characteristics. In Sylveon we picked up 7 stitches, but for Vaporeon, we’ll only need 5, so ignore one stitch on either side in the photos.
In the top left picture we’re marking the stitches we’re going to pick up from – in this case, the stitches with the bobby pins in it mark the edge, we want to pick up the 5 stitches in the middle. The top right picture shows row 14 below. The bottom left picture is the finished triangle (through to row 17), and the bottom right is the tails hidden and the cap attached.
14. (pick up 5 stitches opposite side of the tail) sc 5 (5)
15. dec, sc, dec (3)
16. dec3* (1)
17. ch to finish off (1)
*a “dec3″ is different to decrease 3 in a row – in a dec3 we want to join three stitches, instead of two stitches like we do with a normal decrease. Take a look at this tutorial if you haven’t done this before 🙂
You can use the tail from the point to secure the triangle, and the tail from the back of the cap to secure the cap to the head. It doesn’t need to go through every stitch. I usually secure it ever 6th or 7th stitch. Be careful not to pull too tightly, or the cap will have dents.
BODY
1. (in Light Blue) MR 6 (6)
2. [ inc ]x 6 (12)
3. [ inc, sc ]x 6 (18)
4. sc, [ inc, sc 2 ]x 5, inc, sc (24)
5. [ inc, sc 3 ]x 6 (30)
6-8. sc 30 (30)
9. [ dec, sc 3 ]x 6 (24)
10-12. sc 24 (24)
Finish off, no tail necessary.
LEG (make 2)
1. (in Light Blue) MR 6 (6)
2. [ inc, sc ]x 3 (9)
3-6. sc 9 (9)
Finish off, leaving a tail for attaching to the body later.
ARM (make 2)
1. (in Light Blue) MR 6 (6)
2. [ inc, sc 2 ]x 2 (8)
3-4. sc 8 (8)
5. dec, sc 6, (7)
Finish off, leaving a tail for attaching to the body later.
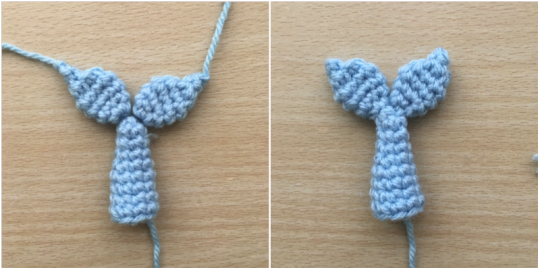
EARS (make 3 – one is less of an ear and more of a mohawk)
*Note, wherever it says “ch 1, turn” the next stitch will be in the second stitch from the hook. The ch 1 is kind of like a buffer stitch to make room.
1. (in Butter/Cream) ch 5, ch 1, turn, sl st, sc, hdc, hdc, dc
2. ch 1, turn, sc 5
Finish off. Take the dark blue yarn and pick up a row of stitches across the first row (the one that seems longer – this will be the top of the ear/fin).
TAIL FIN (make 2)
1. (in Light Blue) MR 6 (6)
2. sc 6 (6)
3. [ inc, sc ]x 3 (9)
4. sc 9 (9)
5. sc 3, dec 3 (6)
6. dec 3 (3)
Finish off, leaving a long enough tail to attach to the tail. Pull the tail yarn back through the fin so that it’s coming out of the original MR.
TAIL
1. (in Light Blue) MR 5 (5)
2. sc 5 (5)
3. inc, sc 4 (6)
4. sc, inc, sc 4 (7)
5. sc 2, inc, sc 4 (8)
6. sc 3, inc, sc 4 (9)
7. sc 9 (9)
8. sc 4, inc, sc 4 (10)
9. sc 10 (10)
Finish off, leaving a long enough tail to attach to the body later.
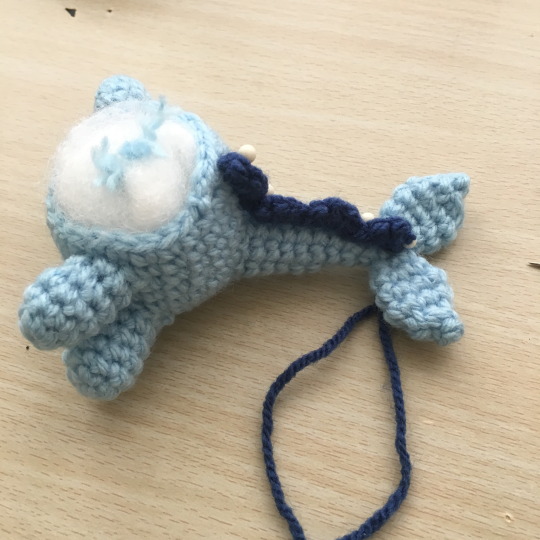
RIDGE
1. (in Dark Blue) ch 10
2. ch 1, turn, sc 3 in next 2nd chain from hook, [ sl st 2, sc 3 in next stitch ]x 3
You’ll end up with 4 little ridges, starting and ending the chain on the 3 sc in the same stitch.
Finish off, leaving a tail long enough to attach to the body and tail later. I’ve created a bit of a step by step photo of this process so the instructions are a little clearer. Your finished product will probably curve quite heavily – mine did. This isn’t a problem, since we can just stretch it out and sew it in place on the body later.

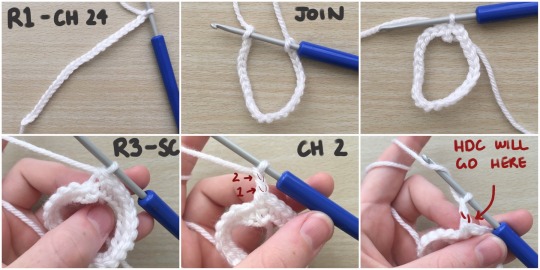
FRILL
1. (in White) ch 24, join
2. sc 24
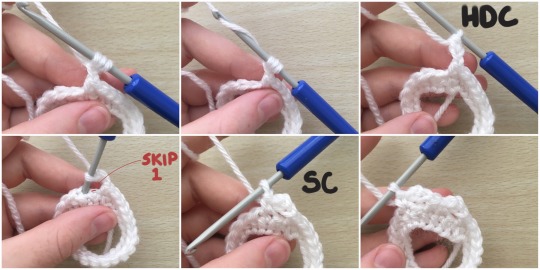
3. sc, ch 2, hdc in second chain from hook, skip 1, sc (repeat until circle completed).
This was a bit of an adventure to come up with. Originally I tried making the collar with felt, since I didn’t think I would be able to create the shape that I wanted through crochet. In the end I couldn’t create the shape with felt! And it didn’t look as good. After trying a couple of things and using some of the techniques I discovered when creating Jolteon’s collar I came up with this solution.
There are some more detailed photos of the process below – the panels labelled with stitches show that stitch completed (I hope this helps, and isn’t confusing haha).
After the collar is finished, it probably looks a bit small to fit around Vaporeon’s neck – luckily yarn is stretchy. I pull it over the body and then pin it down out of the way while I attach the head. At first I thought I might have to sew the gap that skipping a stitch leaves – but once it was stretched over the neck those gaps disappeared. You can sew them closed if you want to, I just leave it.
Putting it all together
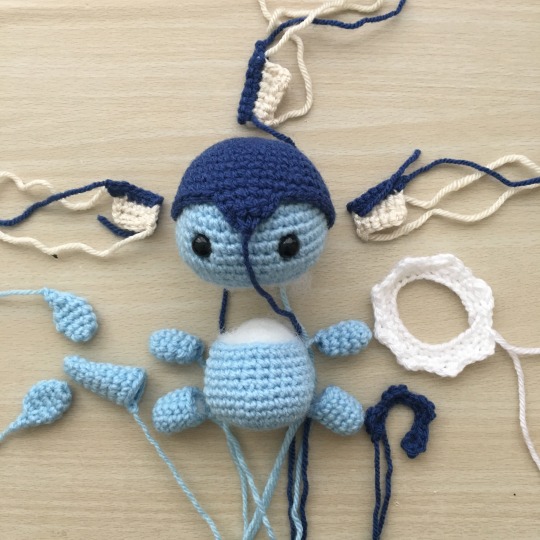
And ta-da! You have finished with all of the crochet pieces – now for assembly. Vaporeon has so many different parts it can look a bit daunting. It can be easier to separate them into groups – items for the body, the head and the tail. Stuff all of the pieces that need stuffing – head, body, legs, tail – and then pin everything in place to get an idea of positioning.
I find it easiest to attach the legs to the body first, then the arms to the body. Then I attach the tail fins to the tail.
Attach the tail to the body, and then it’s time to attach the ridge. I pin this one in place as well, since it keeps trying to curve away. It goes from the back of the body to the tip of the tail. Once that’s done, the collar goes around the neck, and then I pin it out of the way to make room for the head.
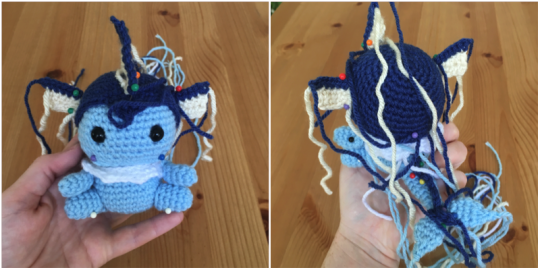
As for the head, I attach the cap first. Then I pin the fins in place and attach them, tidying up the loose tails first (my method of tidying tails is not particularly tidy – I haphazardly thread them through the work and then cut them as close as possible so they seem invisible. One day I might learn the correct way of doing it, but this works for now haha). If you really want to, you can iron or straighten the fins before attaching them to help them stay straight (I put baking paper between the iron and the wool, since the wool I use is acrylic most of the time and tends to melt). Sew the fins on and you’re almost done!
The last thing left to do is attach the head to the body. There should have been 24 stitches in both the last round of the head and the last round of the body. Simply line them up, and whipstitch closed!
I hope you loved putting your crochet Vaporeon together as much as I did, and if you share it on Instagram or Tumblr please tag @53stitches so I can check it out!

Chrisideno
July 18, 2021 at 10:06 amReally like your stuff man, thanks for sharing
53stitches
November 17, 2021 at 8:49 amThank-you! ☺️
Emilie
September 8, 2021 at 8:30 amHi! I loved this pattern, thanks for sharing! 🙂 Just wanted to let you know of a mistake for the head and the body: at the end of those sections it says you should end with 24 stitches around. However, with that count, the frill does not fit around the neck. At the end, where you explain the assembly, it says that the head and body should each have 18 stitches around. I think you’re just missing a final row for the head and body to bring them down to 18!
Otherwise, a very easy to follow pattern and thank you so much for sharing 🙂
53stitches
November 17, 2021 at 8:49 amHello! Thanks for letting me know – I did have a typo but it was about how many stitches you should end up with. 24 is the correct count for the head and the body (18 is how many I have at the end of my humanoid patterns, so force of habit must have made me put the wrong value in).
The frill should also have 24 stitches around the opening, since our starting chain has that many stitches. It may be a bit of a tight fit, but the frill should stretch over the neck opening. If it’s still too tight, you could try adding an additional 3 chains to the starting chain – that’ll give you a little bit more wiggle room and should still fit the repeating pattern.
I hope that helps and thank-you so mcuh for commenting, I’m glad you enjoyed it!
Armando
March 5, 2022 at 5:28 pmAt the cap part in a bit confused on how to make the triangle. While making the triangle, it’s not attach to the head yet, right? It’s still attach to the cap and then you attach it to the head after it’s done? Thanks, love your patterns!
53stitches
March 9, 2022 at 10:37 amYup, that’s the order I do it in anyway! It would be possible to crochet it on after you attached the head, but it would be harder (depending on how you’d sewn it own) so I’d suggest doing it before hand.