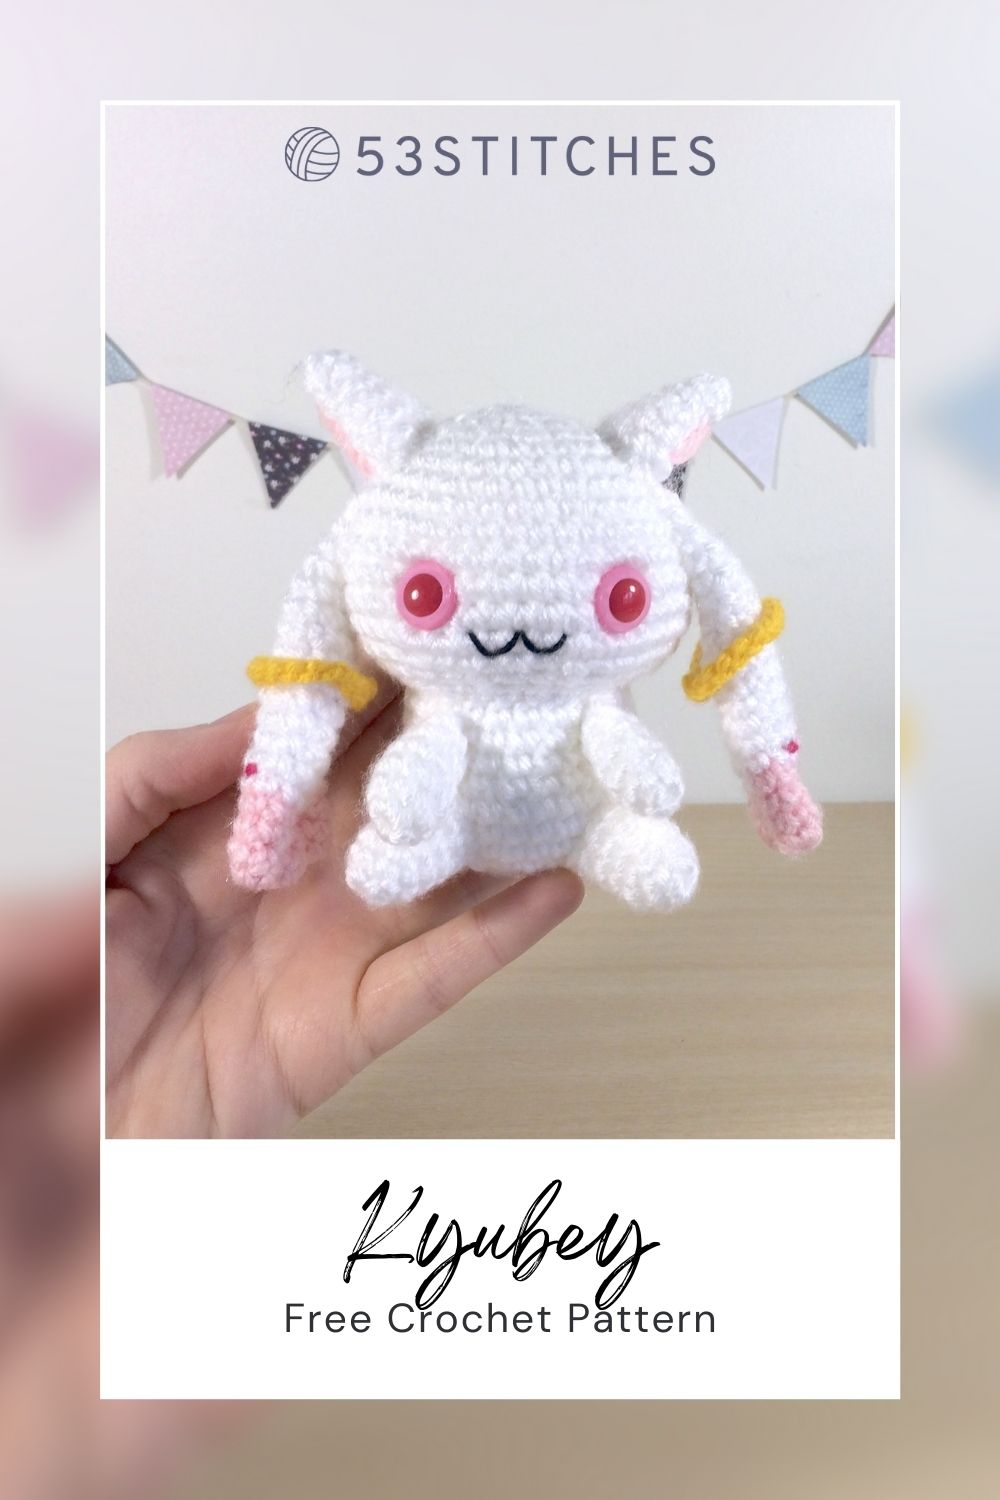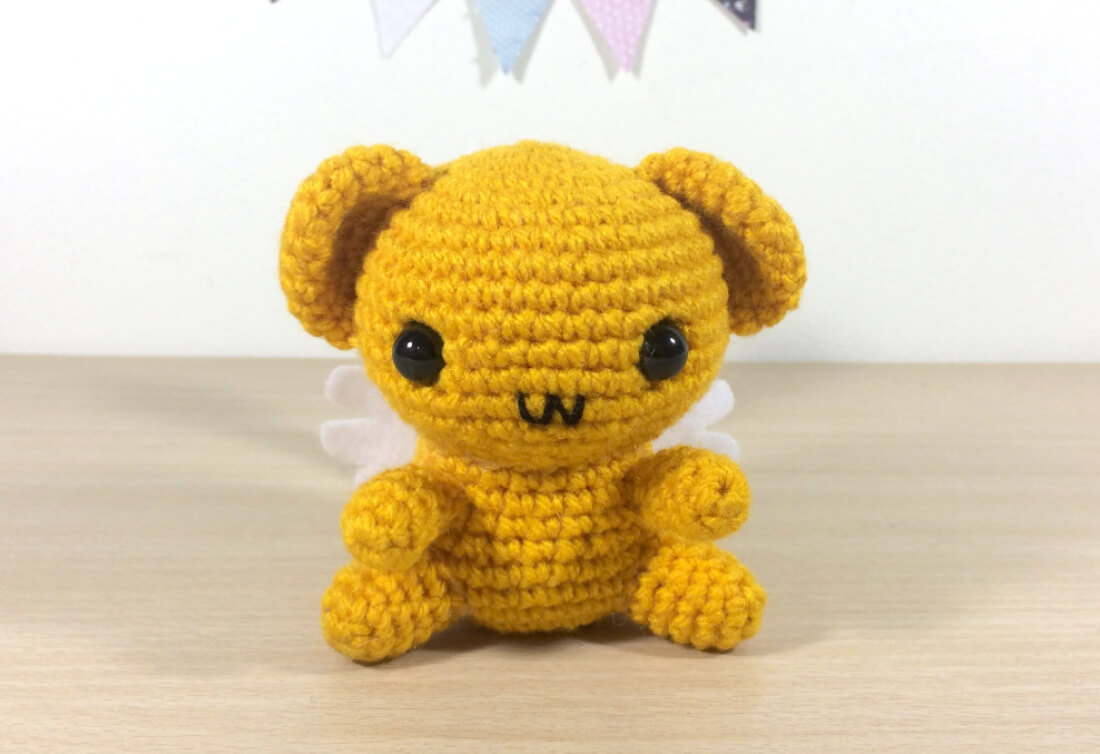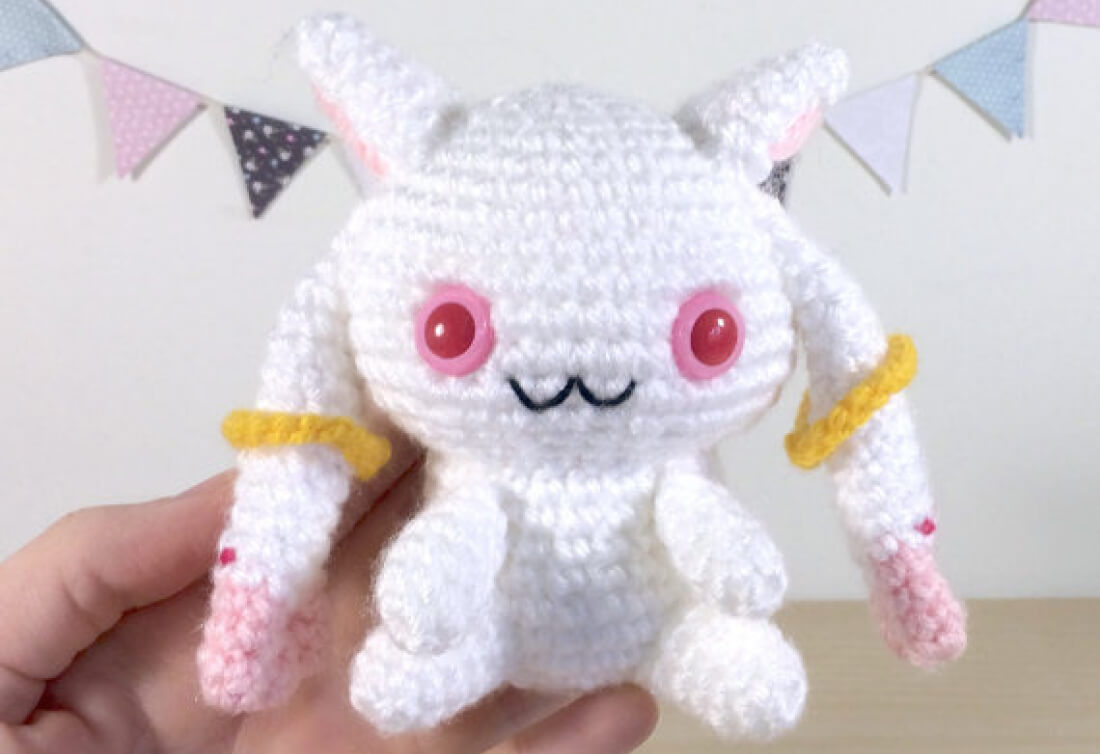
Kyubey makes his appearance at last! Ever since I fell in love with Sailor Moon as a child, I’ve been a big fan of the magical girl genre of anime. Even so, I was not prepared for Puella Magi Madoka Magica haha. Kyubey is such a cute character until you get to know him, but he does still make a great amigurumi, even if he’s otherwise terrible. His ears can be a bit tricky so hopefully I’ve explained this Kyubey crochet pattern well enough! Let’s get started!
You will need:
- white yarn
- pink yarn
- yellow/gold yarn
- pink felt
- black thread
- darker pink yarn
- 2 x 12mm pink/red safety eyes. I got mine from 6060. 10mm would also still look fine.
- 3.00mm crochet hook
- polyester filling
If you’re confused about how to read my patterns check out the FAQ. There’s also a link to a description of the stitches used for beginners 🙂
HEAD
1. (in White) MR 6 (6)
2. [ inc ]x 6 (12)
3. [ inc, sc ]x 6 (18)
4. sc, [ inc, sc 2 ]x 5, inc, sc (24)
5. [ inc, sc 3 ]x 6 (30)
6. sc 2, [ inc, sc 4 ]x 5, inc, sc 2 (36)
7. sc 36 (36)
8. [ inc, sc 5 ]x 6 (42)
9-13. sc 42 (42)
14. [ dec, sc 5 ]x 6 (36)
15. sc 2, [ dec, sc 4 ]x 5, dec, sc 2 (30)
16. [ dec, sc 3 ]x 6 (24)
Finish off, leaving a tail for sewing. Insert safety eyes between rows 11 and 12, with approximately 8 stitches between them.
BODY
1. (in White) MR 6 (6)
2. [ inc ]x 6 (12)
3. [ inc, sc ]x 6 (18)
4. sc, [ inc, sc 2 ]x 5, inc, sc (24)
5. [ inc, sc 3 ]x 6 (30)
6-8. sc 30 (30)
9. [ dec, sc 3 ]x 6 (24)
10-12. sc 24 (24)
Finish off.
LEG (make 2)
1. (in White) MR 6 (6)
2. [ inc, sc ]x 3 (9)
3-6. sc 9 (9)
Finish off, leaving a tail for sewing.
ARM (make 2)
1. (in White) MR 6 (6)
2. [ inc, sc 2 ]x 2 (8)
3-4. sc 8 (8)
5. dec, sc 6, (7)
6. sc 7 (7)
Finish off, leaving a tail for sewing.
TAIL
1. (in White) MR 5 (5)
2. sc 5 (5)
3. inc, sc 4 (6)
4. [ inc, sc 2 ]x 2 (8)
5. [ inc, sc ]x 4 (12)
6. sc 12 (12)
7. [ inc, sc 3 ]x 3 (15)
8. sc 2, [ inc, sc 4 ]x 2, inc, sc 2 (18)
9-10. sc 18 (18)
11. dec 3, sc 12 (15)
12. dec 3, sc 9 (12)
13. sc 12 (12)
Finish off, leaving a tail for sewing.
EARS
1. (in White) MR 6 (6)
2. sc 6 (6)
3. [ inc, sc ]x 3 (9)
4. sc 9 (9)
5. sc 9 (9)
6. [ inc, sc 2 ]x 3 (12)
Finish off, leaving a tail for sewing.
EAR DANGLES (make 2)
I’ve named these ear dangles, unfortunately. Each dangle starts with 3 “fingers”, in pink:
Ear Fingers (make 3)
1. (in Pink) MR 5 (5)
2-3. sc 5 (5)
Finish off two, don’t cut the yarn on the third.
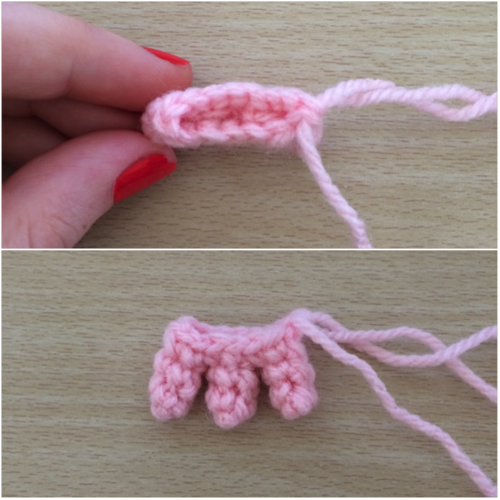
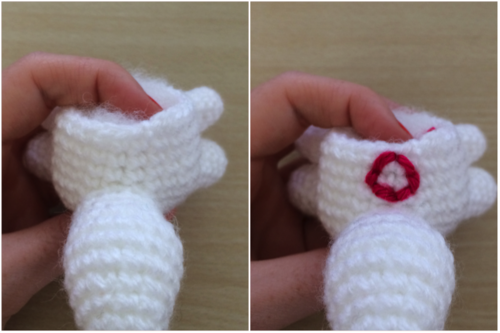
Now comes the tricky part. After you’ve made your three pink “finger” things, we want to join them all together so that the 5 stitches from each finger join to make the 15 stitches in round 4. This is very easy to do once you’ve done it before but it’s a bit difficult to explain. I’ve drawn a small picture below that shows the 3 fingers, each with 5 stitches, and have drawn a line between the stitches that join.
So take the first finger and sc 2 as you would usually (2 sc’s so far), the third sc will be in the second finger (3 sc’s so far). The trick is to make sure that the stitches are as close as they would be if you were completing a regular sc in a round of 15. Then complete one more sc in the second finger (4 sc’s so far); the next one will be in the third finger (5 sc’s so far). The next four sc’s will finish off the third finger (9 sc’s so far), and then the next sc will go back to the second finger (10 sc’s so far). Finish off the last 2 sc’s in the second finger (12 sc’s so far) and then cross over to the first finger again with the next sc (13 sc’s so far). The last two sc’s in the first finger will complete the round (15 sc’s in total).
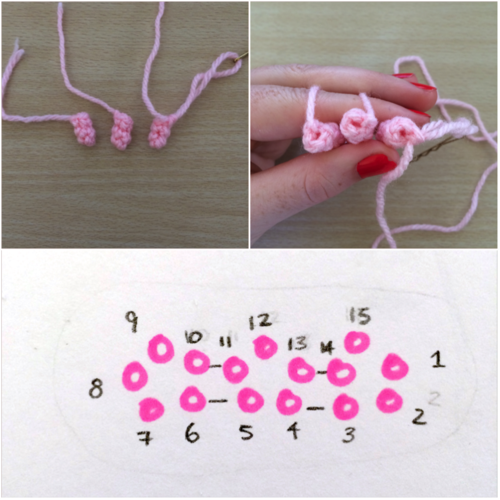
This picture below shows an example of the 3rd stitch of row 4, where you switch over from the first finger to the second finger.
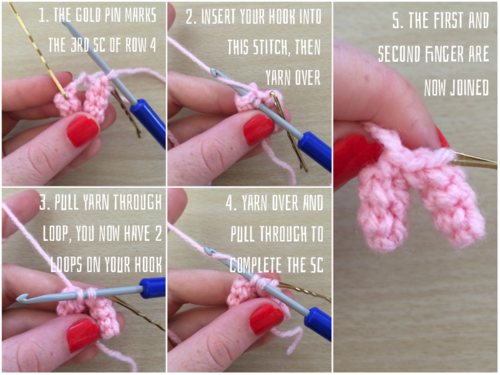
And this is what the ear should look like at the end of row 4.
4. sc 15 (15)
5. (in White) sc 15 (15)
6. dec, sc 13 (14)
7. sc 6, dec, sc 6 (13)
8. dec, sc 11 (12)
9. sc 12 (12)
10. sc 5, dec, sc 5 (11)
11. sc 11 (11)
12. dec, sc 9 (10)
13-14. sc 10 (10)
15. sc 4, dec, sc 4 (9)
16. sc 9 (9)
Finish off, leaving a tail for sewing.
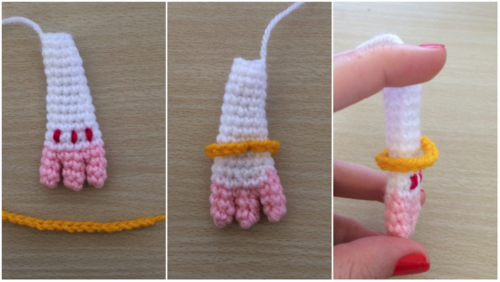
EAR RING
1. (in Yellow/Gold) ch 18 (18)
That’s all of the crocheting done! There’s a little bit of pink detailing left for the ear, and then you should attach the yellow chain. Take a length of pink yarn, darker than the colour you used for the bottom of the ear dangles, and embroider three small dots, like pictured. Then wrap the chain around the ear dangle and use the two tails to secure it between rows 7 and 8. The chain is slightly larger than the ear to give it a ‘floating’ appearance.
That’s all of the crocheting done! Now on to assembly.
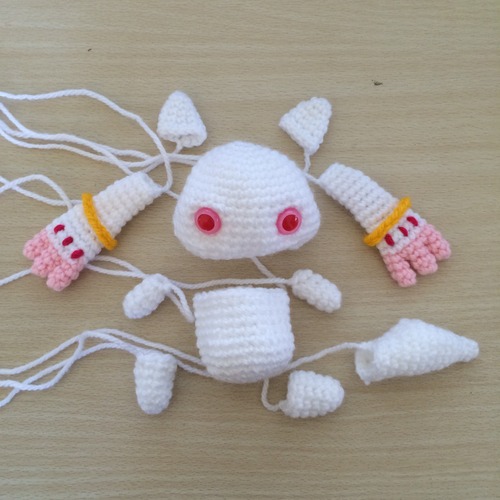
Stuff the head, tail, body and legs. The ears and ear dangles should be pressed flat so there’s no need for stuffing, and the arms are so small that they don’t need it. Before I attach all of the pieces I like to pin them in place to make sure I know how it will look when finished and to help me keep that positioning. Use the tails to sew each body part in place. I usually go in this order: legs, tail, arms, ears, ear dangles, final detailing and then head to body.
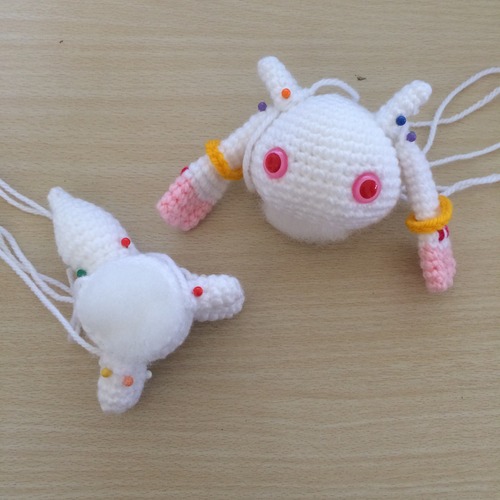
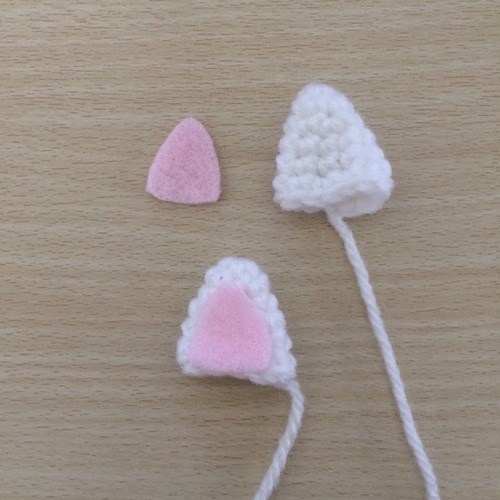
Before you attach the ears however, cut out two triangles from pink felt, slightly smaller than the ears for the pink insides.
Then take a length of black thread and stitch on his oh-so-creepy smile.
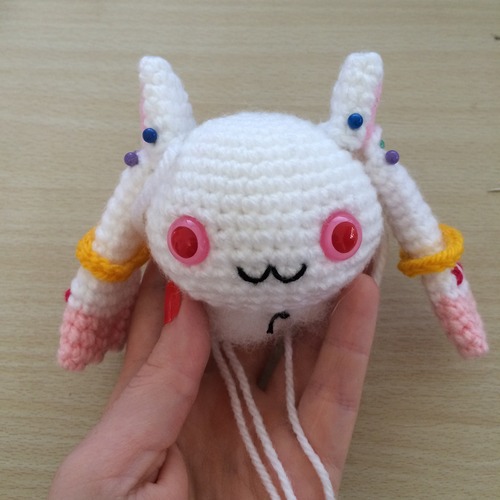
The last detailing left to do is to take a length of darker pink yarn (the same colour you used for the three dots on the ear dangles), and embroider a small circle on his back, just above the tail.
Then continue putting it all together! Done!
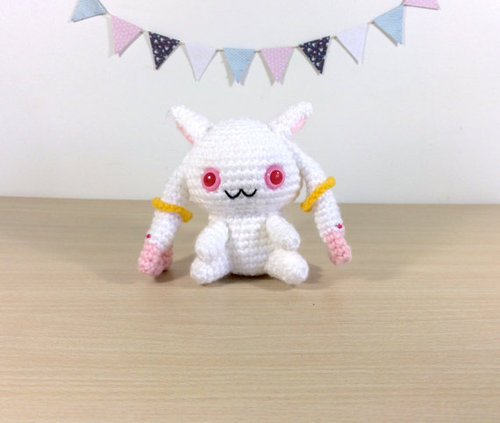
His ears are definitely the most complicated if you haven’t joined separate pieces like this before. I use this technique to join the legs on my human-figure dolls because I could never figure out a way to create a separate body and legs that looked the way I wanted them to. I hope you had fun making him and if you share on Instagram or Tumblr, don’t forget to tag @53stitches so I can check it out!